
This post is a little off-season but better late than never, right? Also, I’ve discovered that my photo documenting skills definitely need improvement. I get way too into a project and forget to take pictures of the steps along the way! Whoops! Anyway, here goes.
For Halloween this year, Pete and I decided that we would do a couple’s costume. He’s not normally a big one for Halloween but he agreed that if I made us the costumes he would wear it. We tossed around a couple ideas but eventually decided that we would be characters from Where the Wild Things Are!
I dressed up as Max and Pete was one of the monsters. Here’s our inspiration:

And here’s how we turned out! (Sorry for the photo quality, I need to start taking pictures with my camera instead of my phone)

Ok. Mine First. I didn’t actually take any pictures of the construction because I kinda just made it up as I went along.

For the onesie I used a cream-colored soft fleece fabric with a wrong side that was indistinguishable from the right side, that way I could be as careless as I wanted cutting and sewing. If I recall correctly, I think I bought about 3 yards.
I accordian folded the fabric length-wise so that there were 4 layers of fabric. The patterning was VERY rough. I just laid out a hoodie and a pair of pj pants on top of the fabric and cut around the edges, leaving at least 1″ for seam allowance and a little extra room. I was left with four identical pieces, each making up an ankle-to-neck panel.
I first sewed together the inseam and the crotch on the legs. When sewing up the crotch I sewed all the way up the back of the onesie but left the front open. I then sewed up the sides of the onesie, extending all the way from leg cuff to sleeve cuff.
For the front of the onesie, I decided it would be easier to just sew in a zipper than to make functioning buttons so I cut a ~6″ strip of fabric to act as the button flap on the front. I folded the fabric in half length-wise so that I had a 3″ wide folded strip of fabric that extended the length of the onesie torso. I pinned the flap to the zipper edge and sewed the flap into the costume as I was sewing the zipper. This was probably a sloppy way to do this, but it was quick and easy and just a Halloween costume! I then sewed some nice big buttons to the front of the flap for decoration and held the flap closed over the zipper with a hook-and-eye closure at the top.
I added the tail next. I used a taupe-colored fleece and free-handed the outline of a tail swoop on a double thickness of fabric. I sewed up the tail, leaving a small opening where it would attach to the onesie so I could turn it right-side-out and stuff it with pillow poly-fill. I ended up stuffing the tail a little more than I had intended, so I made sure to sew it high enough up on the costume that I could flip it up if I wanted to sit down. It’s all about comfort for me on Halloween!

I finished the onesie with some whiskers and claws. The claws were easy. I just cut out some mitten-shaped pieces and as I sewed them together, sewed in some triangle-shaped claws. The paw pieces were only connected to the costume at the back of the hand, just covering the fingers and leaving the palm exposed. This let me keep a better grip on my beer and let me slip them off easily when I needed to.
The whiskers didn’t turn out as well as I had hoped. I meant to go to the Hardware store and pick up some black electrical wiring to use as the whiskers but ran out of time and had to make do with what I had at home. I ended up using some pink pipe cleaners that I tightly wrapped with black yarn. I bent them in half forming a V-shape, cut two small snips in the hood of my onesie and slipped the pipe cleaner through. I tried to hand stitch them into place but found that they were too floppy and didn’t stick out the way I would have liked. I think they needed a support sewn on but I had just flat out run out of time, so I left them as they were!
The crown was the easiest part. I just took gold-colored bristol board. It was white on one side, so I cute the sheet in half and glued the two wrong sides together so that both the inside and the outside of the crown were gold. The fur around the bottom is just a feather boa wrapped around a few times and stapled/glued in place! I didn’t bother with the scepter because I figured it was just one more thing to keep track of and would probably get lost at the bar anyway.
All-in-all, I think it turned out pretty well!!
But Pete was definitely the star of the evening! All night people were running up to him to compliment his costume or even pose for pictures with him! And he was such a good sport, obliging every time 🙂

Clearly, the head was the major effort in the construction of this costume. I found a fantastic Instructables tutorial and used that as my jumping off point. They do a much better job of documenting the process and anyone interested in trying this out for themselves should definitely take a look.
As in the Instructables tutorial, I started with a cardboard ring that would serve as the top of the monster’s mouth.
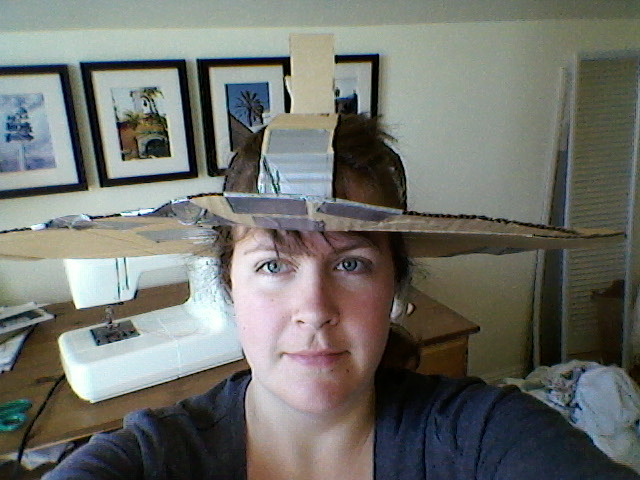 I wanted the head to be huge and oversized, but didn’t really think about how heavy it would get once everything was attached. Poor Pete was walking around with about 5 lbs of extra weight on his head! As an after thought, I wondered if constructing the whole thing around a bicycle helmet for stability would have been a better idea.
I built up the spaces with more cardboard formed around my head, then lined the inside with a cheap skin-colored spandex fabric. To form the head I also built an outer shell out of cardboard that connected the base of the head to the bit sticking out at the top. I then spray glued poly-fill to the outside of it and covered the whole thing with more of the spandex fabric, attaching it with a combination of hot glue, spray glue and staples.
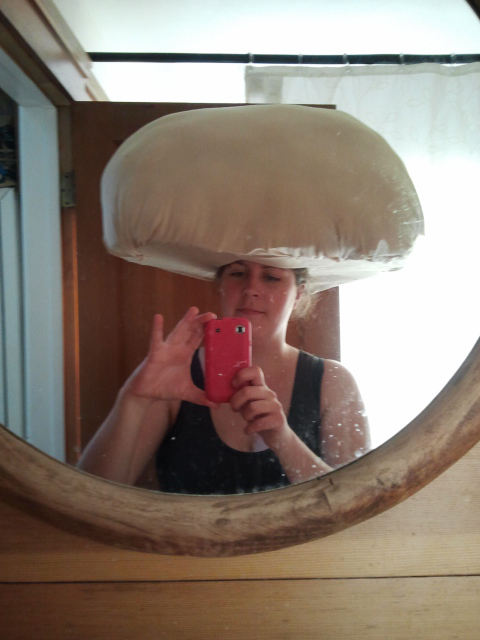 At this point I had what looked like a mushroom head that I could carefully balance on my head. As a side note, I think this would be the perfect base for a Super Mario Toad costume!!
The basic construction of the head was by far the most difficult part. After that it was just decorating which, while time consuming, wasn’t too technically difficult. I had sewed the facial features out of bits of felt, then used a combination of hot glue and hand sewing to attach them to the face. I managed to find the perfect fur to frame the face! It was so shaggy that I really didn’t need to be careful while cutting it and gluing it, the seams weren’t visible. I hot glued/spray glued the fur to the head and made sure to leave a flap at the back to cover Pete’s neck. The horns were just little felt tubes that I sewed and stuffed, then hand stitched to the fur.
 At this point it occurred to me that I had in no way considered how I was going to attach the lower jaw. When I referred back to the Instructables tutorial I realized that I didn’t have any foam and wasn’t going to be able to construct the lower jaw the same way they did. What I did instead was to cut a jaw shape out of cardboard and covered that with fabric. I used an Exacto knife to cut to slits on either side of the face on the underside and just kinda shoved the jaw up in there. It came out a couple times during the night but I would just cram it back in and, remarkably, it held up pretty well!
 The teeth were just doubled up pieces of felt. I lined the mouth with red felt and cut little slits in it that the teeth inserted into. With a little spray glue, they held up pretty well!

Pete’s job was to find pants and a sweater that we could use for the costume. For the sweater, I just spray glued strips of the same fleece I used for Max’s tail onto a brown sweater Pete had. Infinitely easier than trying to sew him a brand new shirt, and with all the effort I’d put into the head, I was looking for infinitely easier options! The pants were equally easy. We just took a black Sharpie to some old slacks and drew on some scales.

I made Pete’s paws the same way I made my own and hand stitched them to the cuffs of his sweater. The tail is just a tube of fur, I didn’t even bother hemming it. I was worried about directly attaching it to the pants because I thought it might get pulled off through the course of the night. Instead, I sewed a loop at the top of the tail and he just looped it into his belt!
And there you have it! A couple’s Where the Wild Things Are costume!


Pingback: Halloween: Bob’s Burgers! | Crafty Little Secret...
Pingback: Bay to Breakers! | Crafty Little Secret…