Category Archives: Uncategorized

DIY Garden Markers (Wit & Whistle Tutorial)

A few months ago I bought a bunch of seed packets to build an herb garden in my kitchen. Fast forward to the present and those seed packets are still waiting to be planted. Whoops! In an attempt to inspire some action I decided to make some garden markers following this fantastic tutorial by Wit & Whistle.

The tutorial was well laid out, extremely easy to follow and I’m quite pleased with the results! The only issues I had was that I had to apply a fair amount of pressure to the stamps to get a letter that showed up well enough in the clay. Sometimes this left the square indent from the bottom of the stamp around the letter. If this happens just lightly run your fingers over the area 4 or 5 times and it should smooth right out.

So head on over to Wit & Whistle and make some garden markers for yourself!

polymer clay garden markers Homemade Garden Markers

Clay Garden Markers How To

Because I still haven’t actually planted my seed packets this ‘cilantro’ garden marker is stuck in a pot of celery…..looks pretty cilantro-like though, eh?!

Tutorial: Origami Swallow Mobile

Swallow mobile

My husband and I have a really odd problem for a San Francisco apartment……we have almost too much space!!! We have vast expanses of huge white walls and just not enough art to fill them, (I know, I know, whaaa whaaa) so we’re trying to think of some creative solutions to add visual interest while we accumulate pieces that are meaningful to us.

Since I’m not from the West Coast I didn’t grow up with earthquakes so they freak me out!!!! I’m ultra-earthquake safe in designing the apartment (except our death-trap project/storage room – more on that another day) and this includes not hanging anything heavy or breakable above where we sleep. So. This week I added an origami paper swallow mobile to draw attention to a great feature of our apartment – the skylights.  It was a little finicky dealing with the invisible thread overhead, but ultimately not too difficult to pull together and they definitely won’t crush us in our sleep if there’s an earthquake. So, there’s that.

All you’ll need for this project is some origami paper, invisible thread and some pushpins. I used actual thread as opposed to fishing line because I wanted it to be as thin and invisible as possible. I was worried the fishing line might catch the light a little too much.

Origami swallowFirst, I made about 35-40 origami swallows using shades of blue, white, black and grey. I found that one package of origami paper (plus a couple novelty sheets) was enough to give me this many swallows. This is great to just pass the time idly with some trashy Netflix on.

Origami birdI used this tutorial to fold the birds, which builds upon the basic origami square base and bird base. I used traditional origami paper but also found some really cool mesh paper (available here). The only drawback was that I found the mesh paper difficult to fold and had to really press each edge to make the folds stay.

Mesh origami birdI attached the thread used to hang the swallows at the front and back of the bird’s torso (according to the photos below). I found that with just a single point, it was too difficult to find the center of gravity and keep the swallow parallel with the ground. I strung up this bird using red thread so you could see it, but for the actual mobile I used invisible thread.

Origami bird

Hanging swallow mobile

Paper mobile

Hanging origami swallowsI found that even with this method of tying the birds, some of them still wanted to slip and end up with their noses up and their tails down, perpendicular to the ground. To keep this from happening I added a dollop of hot glue at the base of each thread just to hold it in place.

Paper swallow mobile instructionsTo hang the birds I first laid a few out on the ground to figure out what kind of spacing I wanted. I decided that I wanted the birds to look like they were flying upwards into the skylight, so I arranged them in a circular pattern.

Origami swallow mobile how to

Sorry for the blurry photo, I guess I had my camera on the macro setting still. Whoops!

I found that I liked a spacing of about 6″ between the center of one bird and the next with a total of 6 birds making up the diameter of the circle. To start constructing the mobile itself I put clear pushpins into each side of my skylight every 6″ and connected side-to-side with the invisible thread (super hard to see, so it’s the arrow in the picture below).

How to make a paper bird mobileI then started stringing up my birds, decreasing the length of the thread they were hanging from as I wound the birds in an upwards swirl into the skylight opening. As I was doing this I was having trouble making the birds all face the proper direction. I mean, one can’t have their paper swallows flying all over the room now can they?! To remedy this,  I added a second thread attached to the birds’ head and attached that thread to the cross-thread ahead of the cross-thread that the body was attached to. Clear as mud, right? Here’s a picture to help illustrate what I mean.

Paper bird mobile instructionThis kept all the noses facing the right direction. If you want your birds flying in a specific pattern like mine, I’d highly recommend adding the head thread before you start hanging the birds. With such fine invisible thread and looking up into the sun as I worked there were moments that I literally couldn’t see the knots I was tying and was operating blind. Adding the head threads to the birds at this point resulted in much Bleepity-bleep-bleeping!

Paper bird mobile tutorial

(Note the vast white expanses that we have to fill)

All in all I’m pretty happy with how the mobile turned out, and I love that the birds end up shadowed against the light when you look up under them.

paper crane mobile instructional

DIY paper crane mobile

Doesn’t the mesh swallow look really cool against the light??

DIY origami crane mobileOrigami swallow mobile instructions

With the exception of the first night, when I rolled over and looked at the shadowed birds against the dark sky and decided it looked like a scene from Alfred Hitchcock’s The Birds, I’m really happy with my new mobile!

Crafty Little Christmas: Handmade Holiday Roundup

First the gift tags, now this?? I’m not trying to give you a heart attack, but Christmas is coming up and if you’re like me, you’re planning on making some things. Every year Christmas sneaks up on me and I end up rushing to make everything on my list!

This year, I’m trying to do a 100% handmade Christmas! Whaaaaaaaaaaaaaaaaaaaaaa???!! Crazy! It’s gonna take planning, folks. And as I’ve been thinking about what to make my friends and family, I thought I’d put together a little roundup of tutorials and ideas from Crafty Little Secret that might inspire you for your handmade Christmas projects. 

To make your presents pretty….

Felt gift tagsIn case you’ve forgotten last week already, head on back and check out this tutorial for reusable felt gift tags.

For the home….

Handmade Place SettingsWhy not whip up some cute pocket placemats or double-sided napkins

Double sided napkin tutorialFor the crafter…..

how to sew a knitting needle wrap

Any knitter would love to get a handmade wrap to keep their knitting needles organized!

Or what about something to keep them warm?……

Chunky cowl knitting……with a hand-knit one skein chunky cowl!

Hope these ideas from tutorials past inspire you to make your own creations this holiday season! Is anyone else planning on a handmade holiday? What projects are you working on to prepare for Christmas?


My Exciting News…….

Remember last week when I said that I had some exciting news?? Well here it is!

I OPENED AN ETSY STORE!!!!!!

To keep everything easy to find, I named the Etsy store CraftyLittleSecret as well (search for it as all one word like that on Etsy), and you can check it out for yourself by clicking “Shop” in the menu at the top of the page, or by clicking here;

https://www.etsy.com/shop/CraftyLittleSecret

I decided to fill the shop for now with my hand embroidered onesies and some cute little felt tags I’ve been working on (tutorial coming up). I’ve tossed around the idea a bit of putting some other things in there, like maybe my placemats or double-sided napkins but nice fabric can be expensive so I’m not sure I’d be able to offer those at a price people would be willing to pay. My one regret is that with shipping and the exchange rate the onesies will be much more expensive for all my Canadian peeps to order.

I’ve been using a couple books as good resources for figuring out how to start a handmade business on the side and I’m planning on reviewing those soon when I finish them, so if you’re hoping to start your own handmade business….stay tuned!

Halloween: Bob’s Burgers!

Last week I gave a sneak peak of our Halloween costumes, did anyone guess our costumes? BOB’S BURGERS!!!

Here’s our inspiration…..

Bobs_Burgers

And here’s our finished costumes…..

Bob's Burgers cosplay
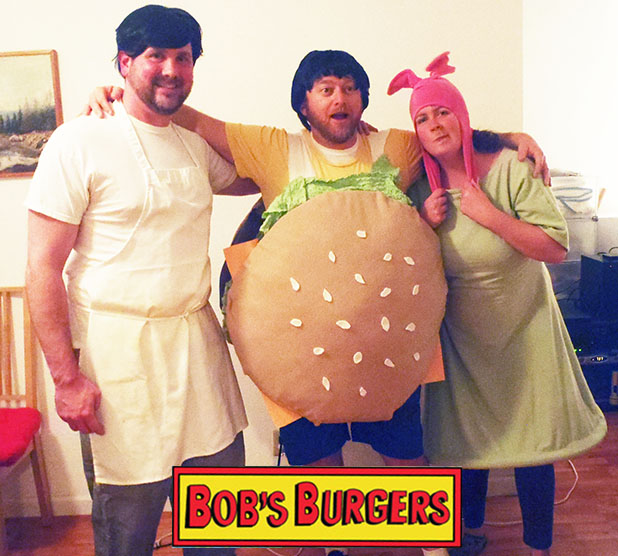
My husband and I went as Gene and Louise Belcher and our friend, Andrew, went as Bob! I gotta say, I really thought this year would be different. I really truly believed that I would get an early start on our costumes. I even started shopping early. But somehow, I still found myself making our entire costumes in the 2 days before Halloween.

Bob. Andrew went as Bob and, fortunately for us, he had worked as a cook and was able to dig some nice greasy cook’s pants and an apron out of his garage. I went out and bought him a wig and a mustache to complete the look. Unfortunately, the mustache was so cheap all the glue stuck to the paper backing instead of the mustache so we weren’t able to stick it to his face. I’m sure there was a solution but we’d dipped into the whiskey at this point and quickly lost interest.

Gene Belcher cosplay

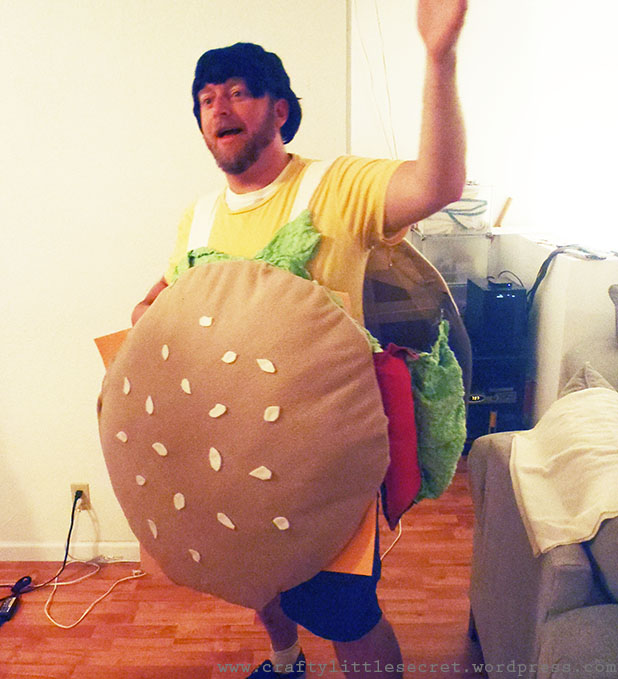
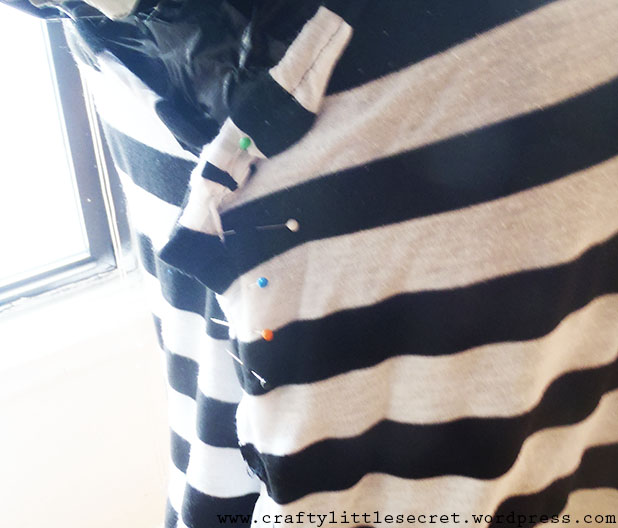
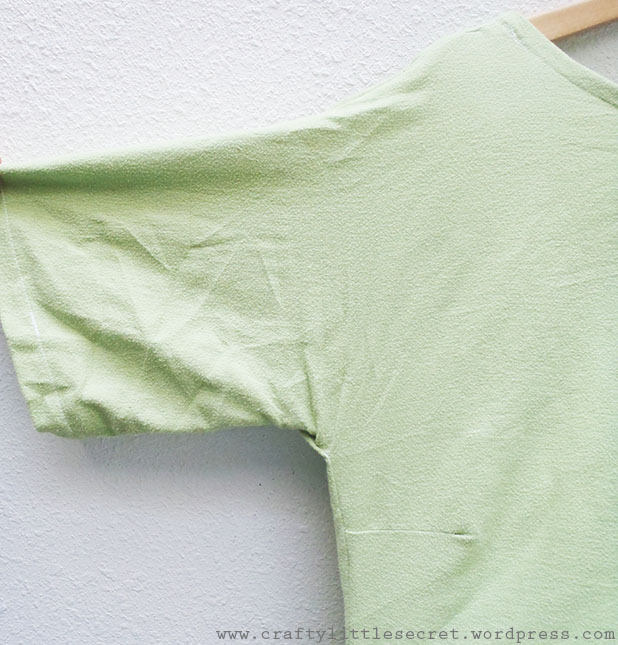
Gene. My husband dressed as Gene and I think his is my favorite of the three. I purchased the wig at a Halloween store, the yellow t-shirt at Goodwill and Pete already had the blue shorts. Andrew and I actually made the hamburger costume the afternoon leading up to Halloween night. I love how it turned out but in retrospect there were some things I could have done to make the construction easier.

Another Halloween habit of mine is having too much fun to take pictures! So, the rest of the pictures were taken the next day in better lighting.

DIY hamburger costume

Hamburger costumeThe hamburger is made out of a mixture of scrap fabric, cardboard, fleece, recycled bits and notions I already owned (ASIDE: I absolutely love having enough of a craft cupboard that I can go to my stash to solve sewing dilemmas instead of the store).

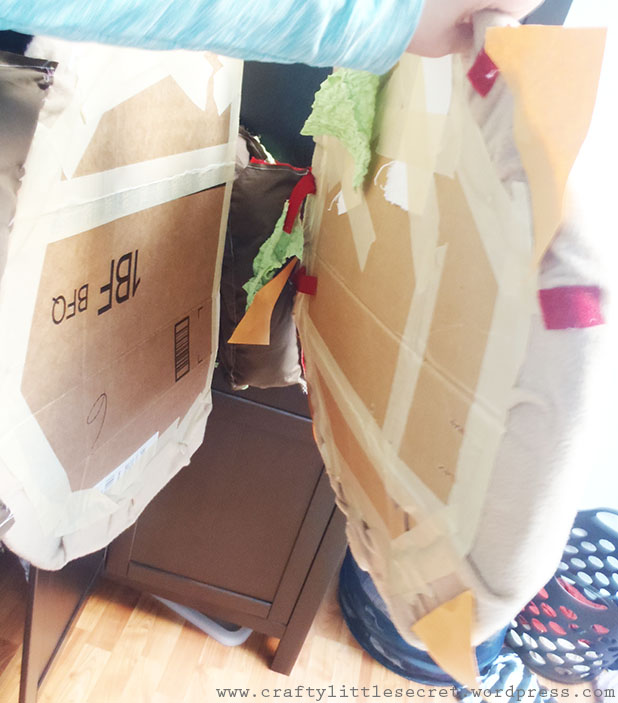
We cut two large circles from cardboard to form the structure of the bun, then cut two slightly larger circles out of the tan fleece fabric. I spray glued Fiber Fill to the top of the cardboard, then laid the fleece over top and spray glued the fleece edges down onto the cardboard. All the edges were reinforced with some heavy duty tape.

My fabric glue of choice is Pro Stick 25 Textile Adhesive Spray. I bought mine from my local fabric store and it is amazing stuff. This is the second year in a row that my husband’s Halloween costume was held together with nothing but fabric glue and tape and it actually held up the whole night!!!

Homemade hamburger costumeThis is one thing I wish I had thought out a little better. By gluing the fleece to the cardboard and forming the buns as a first step, I forced myself into a lot of hand-sewing and spray gluing in future steps when attaching all the bits and pieces.

Homemade hamburger costume
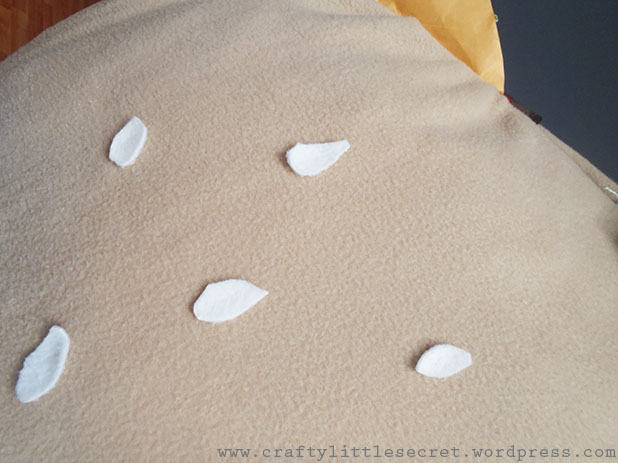
The sesame seeds were cut from fleece leftover from my Max costume that I wore for last year’s Halloween and glued in place with fabric glue.

Homemade hamburger costume

Isn’t the green fabric I found just perfect for lettuce????

The hamburger patty and toppings were a stroke of genius that I wish I could claim credit for, but it was actually our friend Andrew’s idea. I sewed each side panel as a large pillow where each topping was a different pocket. We filled the patty and the tomato with Fiber Fill but filled the lettuce with scrunched up pipe cleaners to give it a floppier appearance with a bit of structure.

Once both side panels were done I hand stitched them to the back bun, then stitched on some velcro I had in my stash to attach it to the front bun. I did this so that Pete wouldn’t feel too constricted in the suit, but I didn’t like that it made the whole thing feel a little flimsier. He liked that it was able to undo the suit though as it helped him when he was trying to sit down!

One thing I want to point out about this costume is what a great mix of new, old and recycled materials are in it. I thought I’d point out the materials and source used for each element:

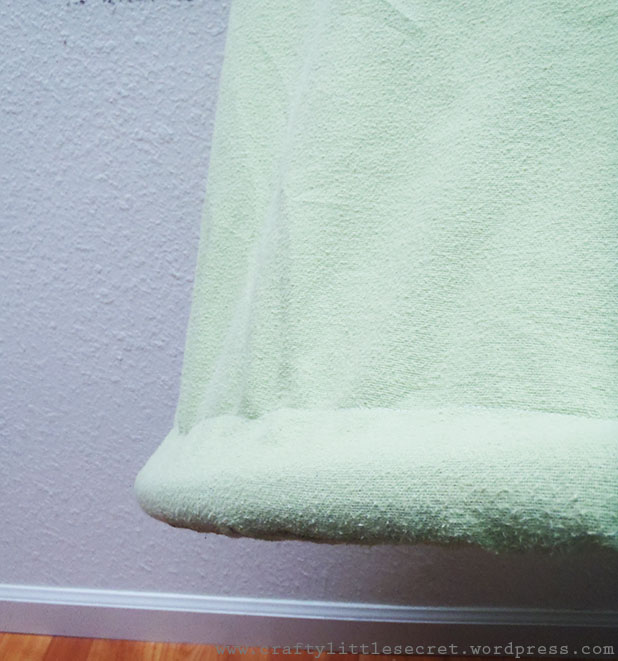
 – Bun: Cardboard, new fleece, scrap fleece from stash
– Shoulder straps: Scrap flannel from stash leftover from my T-shirt quilt
 – Patty: New fabric from the remnant bin at the fabric store
– Lettuce: New fabric from the remnant bin at the fabric store
– Tomato: An old shirt I had in my refashion stash
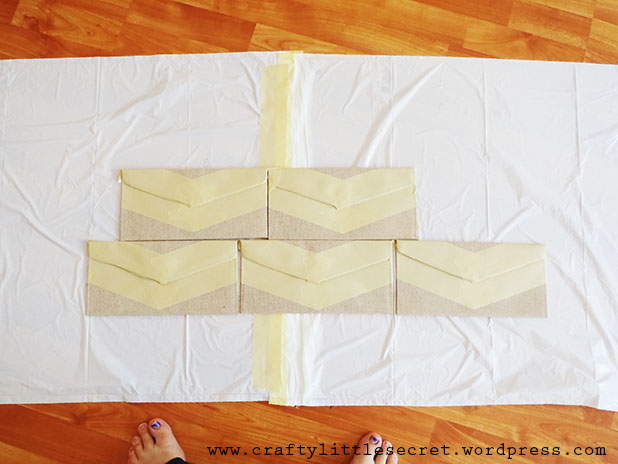
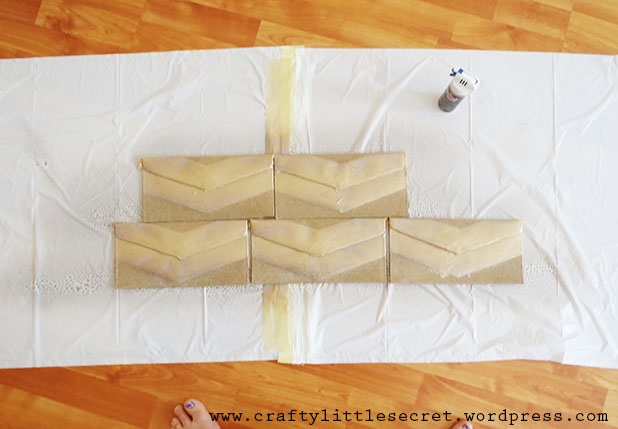
– Cheese: Cut up manila envelopes!!!
– Wig: Purchased new at a Halloween store
– Shirt: Goodwill find
– Shorts: From my husband’s wardrobe

The entire Gene Belcher costume cost us $30.54 (and a full half of that amount was the cost of the newly purchased wig!). Which brings me to another point – the remnant bins at fabric stores are great places to find great deals, especially for something as (potentially) single use as a Halloween costume.

Louise. I made my Louise costume using items I found at Goodwill. Her signature bunny ear hat was made from a hot pink velour shirt and the dress was made from a giant duvet cover that I got for a steal ($4.50 and I didn’t even use half the fabric!!!! The remaining piece might make a great cozy quilt backing…).

Louise Belcher Halloween costumeI very roughly based the dress off a blouse pattern that I had. Very roughly. I basically just traced the neckline and darts, then made up the sleeves (I was definitely not going to be bothered to set sleeves for a Halloween costume!) and added the length. I made a quick facing for the neckline and top-stitched it down to keep it in place. I was in such a rush I didn’t even change my thread color to co-ordinate! Whoops!

Bob's Burgers cosplayLouise Belcher Halloween

You may notice the bottom of the dress keeps its own shape and sticks out. This was Andrew’s second brilliant idea of the afternoon……I sewed an old busted bicycle tire into the hem of the skirt to give it that cartoon kinda look! More recycling!!

Louise Belcher HalloweenI really didn’t want to spend the time inserting a zipper in to this costume but the thing was fitting my like a sack! I took in the waist as much as I could but since the fabric didn’t have any stretch I couldn’t take it in much before it wouldn’t fit over my shoulders anymore. Instead, I just inserted a little elastic panel to the waistline back to snug it in a little more at the waist.

Bob's Burgers cosplayThe hat ended up being surprisingly easy to make. The shirt I used originally had pink sequins sewn to the front of it so before I got started I cut them all off and saved them in my notions stash. Waste-not want-not! Every time I throw out unsalvageable clothes I always look to see what can be saved – buttons from men’s dress shirts, hooks and eyes from bras – it’s all great stuff for the stash!

I used a toque I already owned to trace a rough shape that would fit my head then added the ear flaps when I cut it out. I only lined the ear flaps and just turned up the front for a hem.

Bob's Burgers DIY costume

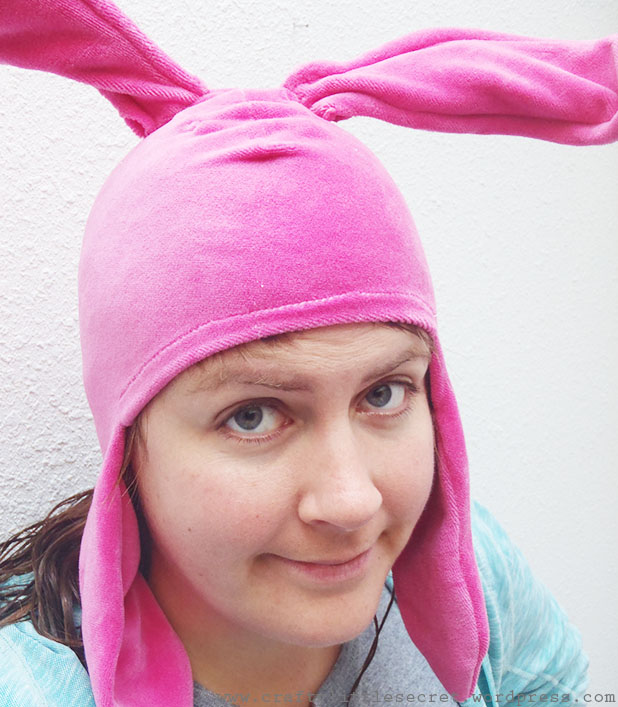
The bunny ears themselves were a bit trickier but not too bad. I sewed the outer edge of the ears then inserted pipe cleaners and pressed them against that outer edge. I then sewed on the inside edge of the pipe cleaner, effectively encasing them in the bunny ears. Careful though, if you nick the metal part of the pipe cleaner that’s a good way to break you needle and send the shards flying….not that I speak from experience or anything….

Bunny hat

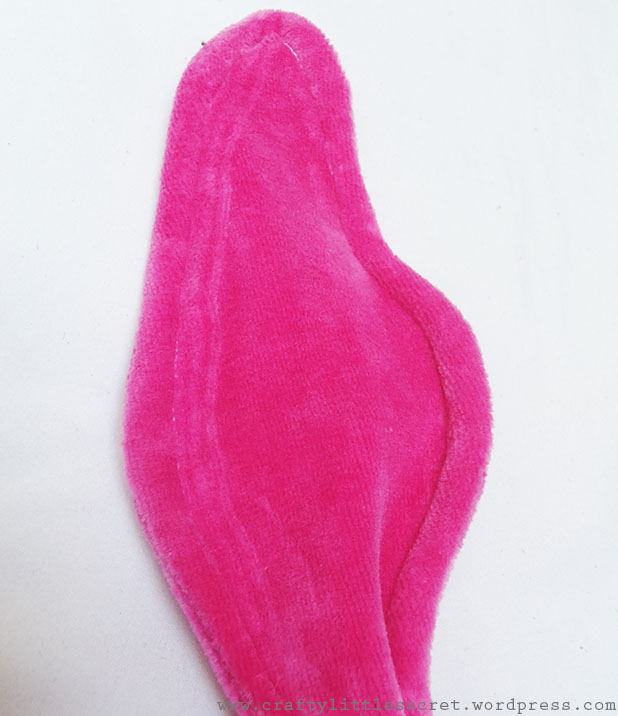
The tough part was getting the ears to stand upright, and I don’t think I totally succeeded with that (maybe I would have tried some more options if I’d left myself more time). I positioned the bunny ears while wearing the hat then sewed them on. Once they were secured I cut a small hole up through the bottom of the hat and into the center of the ears. I folded a pipe cleaner in half and inserted the folded end up through the hole, leaving a couple inches of the ends exposed. I bent those ends in opposite directions, one going toward the front of the hat and one going toward the back, then hand stitched them in place.

Louise Belcher DIY Halloween

And that’s it! Done! The entire Louise Belcher costume cost me a measly $9.98 (with yards of fabric still left) and used only refashioned fabrics from Goodwill and notions from my stash! It was a green Halloween!!

Now for the hard part…..finding a place to store all these costumes!!

Halloween Sneak Peak

One of my favorite holidays is coming up so obviously I just have to make costumes for Halloween! This year I’m making costumes for myself, my husband and his friend, but they’re all pretty easy so it shouldn’t be too crazy. Can you guess what we’re gonna be?? Here’s a hint, it involves pink bunny ears and a hamburger suit.

Halloween Sneak Peak(The flowers aren’t part of the costume, they’re just a pretty surprise from my husband!)


DIY Fix: Striped Tanktop

One great thing about blogging is that it encourages me to finish up projects that would otherwise sit unfinished on my sewing table forever. I’m the type of person who works well with deadlines, however arbitrary, so trying to keep up with my Mon/Thurs blogging schedule helps keep me from getting too lazy!

Remember that striped tank top I posted about back in April? The one with the gaping armholes? No? You should read my blog more. Well, I finally got around to sewing up the armholes…..with the simplest fix on Earth.

Here’s the before shot to refresh your memories:

Gaping armhole before fix

Sorry for the armpit shot. There really is no nice way to photograph one.

I was really procrastinating on fixing this due to my proclamation that I was going to start trying to sew “properly”. I thought that the “proper” way to do it would be to undo that armhole binding, snip out the extra fabric or insert a dart, then re-sew the binding. That sounded like a lot of work. Thankfully, I found myself a loophole. I decided that since this shirt was made before the proclamation (and was indeed partly what inspired it), I could grandfather it in on the old system of quick fixes. Phew!

Gaping armhole before fixI set my shirt up on my duct tape bust form that looks disturbingly like Rubber Man from the first season of American Horror Story (I haven’t done a duct tape bust form tutorial on this blog because there’s a million good ones out there…..and mine is too creepy to photograph in detail). All I did was take in the sides under the arms.

DIY fix gaping armholeYup, a few pins, a couple stitches and I was done. Totally glad I waited seven months to correct that problem. It was so laborious!

Gaping armhole fix

Previously, I had to wear my shirt covered up with a cardigan like this:

Skulls and stripes

I don’t know what my bangs are doing in this picture. It’s that damn hair and makeup team slacking again!

And that worked for the most part. But what if I got hot???? What then????? I couldn’t just walk around with my bra hanging out (no matter what kids today are doing)!!!!!!

Gaping armhole fix

Now I’m free to bare my arms in this shirt without a worry in the world!

Gaping armhole fix

Gaping armhole sewing fix

It’s those darn bangs again, they’re making me look silly!!


DIY Clutch: Tutorial From Knack and Whimsy

My friend is getting married this weekend and wanted it to give her bridesmaid a cute and stylish gift. She stumbled upon these super chic, adorable and affordable clutches from Knack and Whimsy complete with an easy to follow tutorial!

DIY Painted Purse Tutorial

Photo from Knack and Whimsy – http://www.knackandwhimsy.blogspot.com

My friend is so busy with her upcoming wedding that I volunteered to help her out a bit and took on painting the clutches. It seriously took me, like, 30 minutes start-to-finish. We even found the exact clutches suggested over at Knack and Whimsy at Hobby Lobby (thanks for the tip!). The only thing we did differently than the Knack and Whimsy tutorial was we used a spray on fabric paint that was not quite as bright as the gold paint in the original post.

I taped off all the areas I didn’t want painted and laid them out on a garbage bag to keep things neat. When using fabric paint spray, make sure you start and finish the spray off the fabric and to paint with nice even strokes holding the can about 8″ away. The only trouble I encountered was that the paint sputtered on one of the clutches as the can was running out so there’s a spot where the paint is a bit thicker on that one (if you squint you might be able to see the offending blob on the bottom right purse).

DIY PurseDIY Fabric Paint ClutchI waited about an hour for the paint to dry then peeled off the masking tape. They worked great! Thanks so much to Knack and Whimsy for the fantastic tutorial!!!

Hand Painted Purse


Art Under the Microscope

For those of us who do a lot of microscopy at our day jobs, it comes as no surprise that biology can be beautiful. I saw yesterday over at Sew Well that the journal Cell has a feature called “Art Under the Microscope” where fiber artists interpret beautiful cellular images. Go check it out, both the microscope images and the quilts are amazing!

In undergrad I tried to do something similar and would paint microscopy images from my textbooks, with limited success. But then I got to move on to the Big Leagues and got to do a lot of microscopy throughout my PhD and postdoctoral work that really produced some gorgeous images (though not always so scientifically relevant…). Anyhoosidoodle, I thought I’d share some of those images with you here! Three cheers for science!

Art Under the Microscope

I won a contest with this image during my PhD when it was selected to be the cover art for Grad Student Research Day for the med school.

The image above is showing cellular membrane fusion. You can pick out each cell’s nucleus as the big blue ovals with dark spots in them (or the dark spot in the red cell). Normally, each cell would be self-contained and surrounded by it’s own membrane like a sack (think: fried egg). In the blue cell though, you can see that all these cells share the same membrane/”sack”. Their membranes have fused together making one giant cell with multiple nuclei! Some viruses use this “membrane fusion” phenomenon to infect cells and spread throughout the body and that, in a nutshell, is what I’ve spent a lot of my career so far studying.

Art Under the Microscope

Sorry for the poor quality, this is an instagrammed picture of a computer screen, LOL!

I got teased a little for instagramming my science but I just thought it was so pretty I couldn’t help myself! The big blue ovals in this picture are individual nuclei and all the little red dots are viruses!!! The green is something called “green fluorescent protein”, or GFP. It was first discovered as the cause of bioluminescence in certain species of jellyfish but has since become one of the most powerful tools in molecular biology!! (I love that story because it’s a great example of why basic science should be funded – you never know what you’ll discover or how it will be used in the future!)

Ok, that’s enough geeking out for one Saturday afternoon!

Re-Grow Your Celery and Lettuce!

A couple months ago I posted about re-growing your green onions and it worked fantastically! In fact, a week or so after that post I planted them in soil and they’ve been doing great ever since! They’re still re-growing quickly after cutting.

OLYMPUS DIGITAL CAMERAThe green onions worked out so well that I decided to expand into celery and lettuce! Oooooh! Ahhhhhhh!

Re-growing these veggies works basically the same way as the green onions. Cut all the stalks off from the bottom stump of celery (or romaine lettuce).

OLYMPUS DIGITAL CAMERA

OLYMPUS DIGITAL CAMERAPut the remaining celery nub into a little bowl lined with a paper towel and about a half inch of water. Then wait….

OLYMPUS DIGITAL CAMERA……and wait……

OLYMPUS DIGITAL CAMERA……and wait…..

……and about 3 weeks later, you should finally have a wee little celery plant starting.

OLYMPUS DIGITAL CAMERA

OLYMPUS DIGITAL CAMERAEven after this much time though, the roots have still just barely started to form. So I’m going to wait another couple weeks before I try planting this in soil.

OLYMPUS DIGITAL CAMERAAnother vegetable that I’ve found this method works great for is romaine lettuce! And good news, it seems to take a lot less time than the celery. I’ve had this lettuce nub (prepared the same way as the celery nub) growing for about 1.5 weeks, half as much time as the celery. Yet it’s the same size! I think I see the very beginning of some roots forming, but I’ll definitely have to give it more time before I plant.

OLYMPUS DIGITAL CAMERA OLYMPUS DIGITAL CAMERA OLYMPUS DIGITAL CAMERA

The verdict so far on regrowing vegetables from food scraps? Green onions, totally worth it. Celery and Lettuce, mmmmmm probably not so much. But hey, it keeps me entertained while I’m unemployed, LOL!

UPDATE: The lettuce looked great up until about a week ago, at which point it suddenly shot up a huge stalk from the center with a few leaves coming off it. A quick search of the interwebs informed me that this is called “bolting” and seems to be caused by exposing the plant to cold temperatures early on (hmmm…..like beside an open window in San Francisco???) then when the weather heats up, the plant puts up one of these “bolts”. Unfortunately, the interwebs also informed me that when the lettuce bolts it becomes unsalvageably bitter. Bye, bye little lettuce, we hardly knew ye…..