Author Archives: missphd

Chemistry Oven Mitts

They’re baaaaaaaaaaaaaack! And only 5 years after I originally hinted they may be available in my Etsy shop 😀

Robot Lab oven Mitts from Crafty Little Secret

Oh my dear friends, I have been gone for so long and I have so much to tell you! But much of it will have to wait because [Spoiler Alert] one of the reasons I’ve been gone so long is that I was busy birthing and raising a child. And boy oh boy, turns out that takes a chunk out of your free time.

I’ve also been busy working on a passion project and I’m just about to burst with excitement because I’m very near official Launch with a capital “L”. So stay tuned for more on that soon!

And, oh yeah. In the past 16 months I’ve also moved. Twice! One of those times was across state lines and the other was into my very own house. [Another Spoiler Alert]  Buying, moving into, and making a home out of a house also takes a big bite out of your free time. Who knew?

Science and Chemistry Oven Mitts by Crafty Little Secret

Babies, new businesses, big moves. It all adds up to me being terribly neglectful to this here poor blog. But I’ve got some fun projects that I managed to work on during all the Busy of the past 2 years that I’m dying to share with you and I’m scheming on a way to make some more time for myself to actually manage that.

So until then, I leave you with this PSA to let you know that you can, finally, have your very own pair of sciency oven mitts. Ta-ta for now, but hopefully not for long!


Me-Made May 2016 Pledge

Admittedly, I’ve been a little (ok, a lot) slack in my blogging of late, but I’m still excited for Me-Made May. This year more than ever, I’m hoping that Me-Made May will help to re-invigorate my sewing mojo and get me back at my machine on the reg. At the very least, hopefully it will encourage me to post some unblogged finished projects!

Assessing my wardrobe in preparation for the challenge has me concerned that some staples from previous years are now starting to look a little tired and worn. Here’s hoping the challenge will help push me to fix what can be fixed and replace what can’t. So, without further ado, here’s my pledge:

‘I, Eileen of ‘Crafty Little Secret’, sign up as a participant of Me-Made-May ’16. I endeavour to wear one me-made clothing item each day for the duration of May 2016. I will take pictures daily and post a round-up here once a week. 

Here we go….

Channeling Jeanie Bueller: My First Granville

I didn’t set out to channel Jeanie Bueller, but as I was working away on my top Ferris Bueller’s Day Off came on tv and my husband called to me, “That’s just like your shirt!”

jeannie bueller

And it kinda is.Sewaholic Granville front hanging

I bought this fabric along with another selection with the intent of making myself some collared shirts for the office. It can be so hard to find ready-t0-wear button up blouses that fit my bust, let alone ones that are also in a fun print!

This is my first collared shirt and, I gotta say, I’m pretty impressed with myself for making such a wearable muslin. I used the Sewaholic Granville pattern and the instructions were pretty clear and easy to follow. With the exception, that is, of the cuffs.

As I was inserting the sleeves into the cuff pieces, on both sides I ended up with too much sleeve fabric compared to cuff, as though there should have been a pleat. But the pattern didn’t call for a pleat. I’m not quite sure what I did. Did I somehow sew the sleeve placket incorrectly? Was there supposed to be a pleat and I was just missing it? Anyway, I ended up just adding a pleat. Done and done.

Sewaholic Granville sleeve placket

I was particularly afraid of the collar, but I didn’t need to be. Turns out, it’s not so bad! A little rough perhaps on the collar stand, but not at all bad for a first go.

Sewaholic Granville collar detail

The thing I was most impressed with, however, was the button placket.

Sewaholic Granville button stanceOooooooooh! Aaaaaaaaah! Have you ever seen such straight and even top-stitching? Such perfectly spaced buttons? Such just-the-right-size button holes?

Sewaholic Granville back hanging

My main error in stitching up this pattern, I think, is in the sizing. My bust is usually one size larger than my waist, which is usually one size large then my hips, when selecting pattern sizes. Instead of doing a proper full bust adjustment, I just graded this pattern accordingly.

Sewaholic Granville back

It’s not terrible, but it left me with more room in the back than I need and larger (and longer!) sleeves than I need.

Sewaholic Granville sleeves

The Granville pattern also flares out a lot in the hips, much more than I need it too. I think that in my next iteration I will cut even more fabric out of the hips and, for this top, I am still considering darts. While a looser or boxier shirt can be flattering on many people, for me it often just makes me look like a giant cylinder. As though my whole body is the same circumference as my bust. Next time I sew this, doing the full bust adjustment instead of grading might also help.

Crafty Little Secret - www.craftylittlesecret.com - Channeling Jeannie Bueller, Sewaholic Granville shirt

My last couple projects (I’ve been sewing, just not blogging), have been a little more complicated lately. This shirt was fun, but it also made me realize that I have different sewing moods. Sometimes I want a technical sew. Something that requires precision or teaches me a new technique. But, more often than not, I just want to sew! Whipping up a new t-shirt can bring me just as much satisfaction if I’m in the mood for it.

Lately, I’ve been delighting in the repetitive cutting and sewing of a simple quilt….

Sundays are for Shibori.

Indigo hand - Crafty Little Secret - www.craftylittlesecret.com

A friend of mine attended a shibori dying workshop a couple months ago and has been addicted to shibori ever since. I’d been toying with the idea of working on a shibori quilt or other project, but just never really got my rear in gear. So when he offered to spend a Sunday teaching me about shibori dying and generously sharing his tools, I jumped at the chance!

Ryen already had the indigo all set up and ready to go when we got there, and I didn’t really take enough pictures/notes to make a tutorial, but I thought it’d still be fun to share some of our experiments.

Shibori Inspiration - http://www.urbanoutfitters.com/urban/catalog/productdetail.jsp?id=32197162&category=A_FURN_BEDDING_THROWS

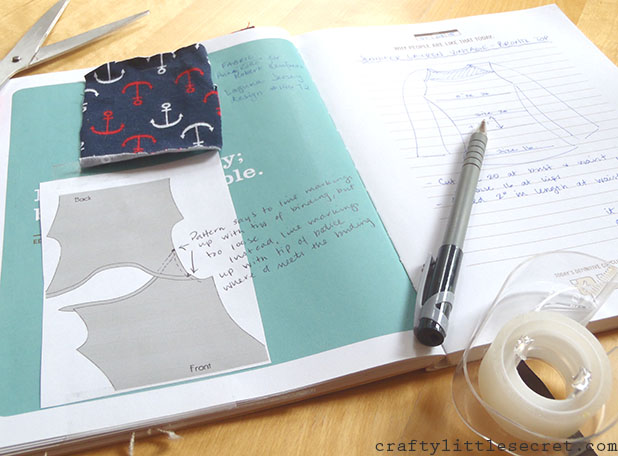
I hunted around online a bit for inspiration before I started and found this pillow from Urban Outfitters. I loved that the fabric was left with a large amount of white space and very little had actually been dyed.

shibori folding
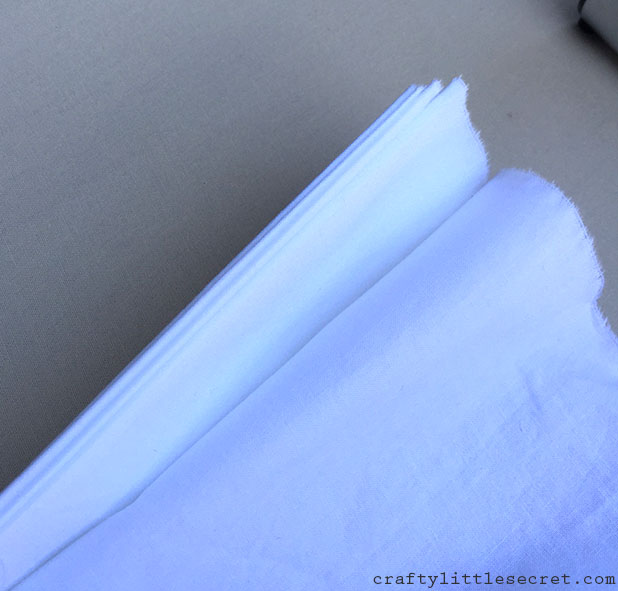
This isn’t really the best photo, but to get the look I was after I started by ironing the fabric into a long accordion. So much ironing.

Shibori wrapping - Crafty Little Secret - craftylittlesecret.com
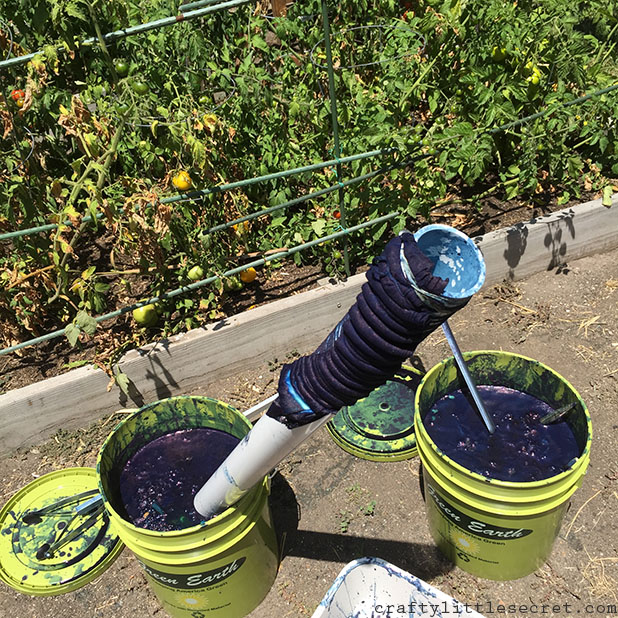
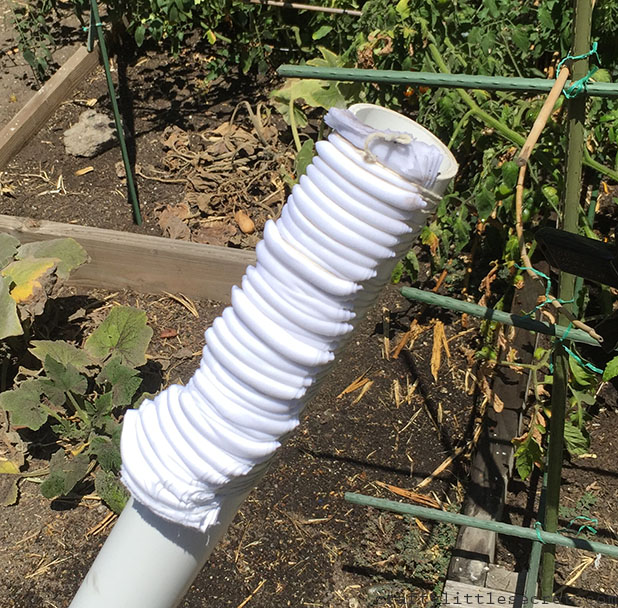
Next I laid the accordion-folded fabric against a PVC pipe and wrapped it with twine. Once it was all bundled, I smooshed the fabric until it looked as it does in the photo above. With shibori, any of the fabric that is against the pipe or the string will not take the indigo and will stay white. Any fabric that’s smooshed up away from the pipe will take on the indigo dye and end up colored blue.

Shibori Dying - Crafty Little Secret - www.craftylittlesecret.comWho knew that indigo dying could be so time-intensive? Turns out that to get that nice deep dark indigo color, you need to dip the fabric multiple times. The exact number of dips depends on the type of fabric, and natural fibers are required. I was using some nice white Robert Kaufman Kona cotton. You start off by soaking the fabric in water for 20 min; this prevents the dye from bleeding through the bound areas of your fabric. You then cycle your fabric, 20 min in the dye, 20 min drying on the line. Repeat until desired color is achieved. I had two pieces of fabric, one tied to either end of the pipe, so I was just flipping the pipe every 20 min.

shibori on the line

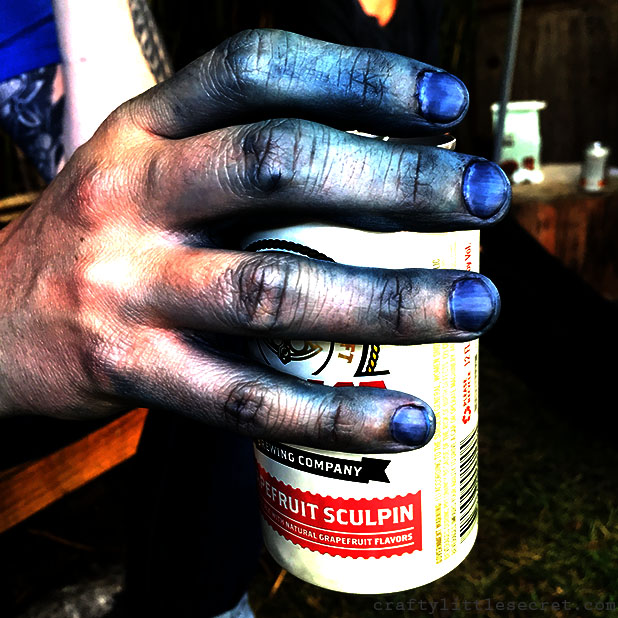
I didn’t catch any pictures of it, but when the fabric comes out of the dye bath it’s actually a lime green color. The deep indigo color develops through an oxidation reaction that occurs once the dye is exposed to the air.

Shibori Dying - Crafty Little Secret - www.craftylittlesecret.com
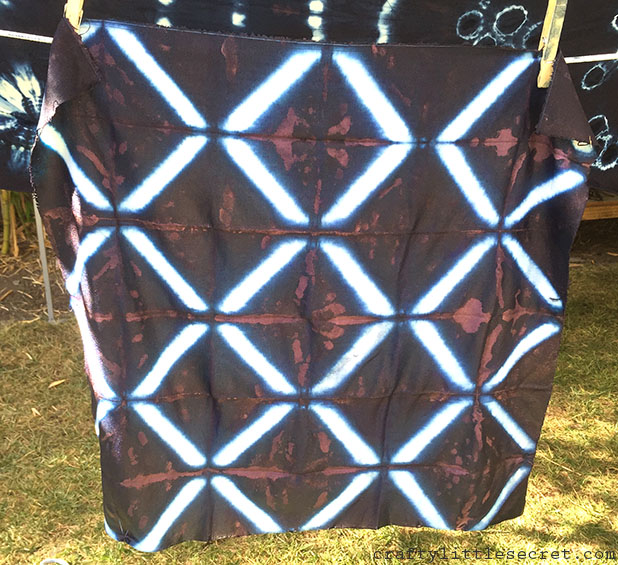
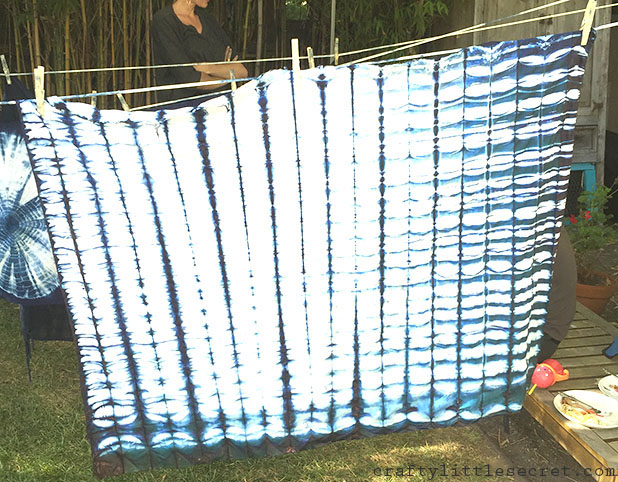
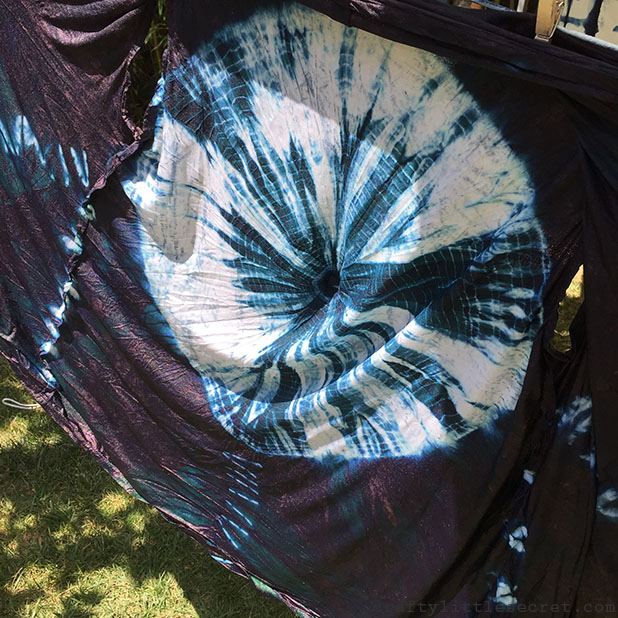
This is how my first piece of fabric turned out! Stay tuned to find out what it gets sewn into….

I also brought a long scrap of cotton knit fabric and decided to play with some different techniques and made a sampler scarf.

Shibori dying tools - Crafty Little Secret - www.craftylittlesecret.com
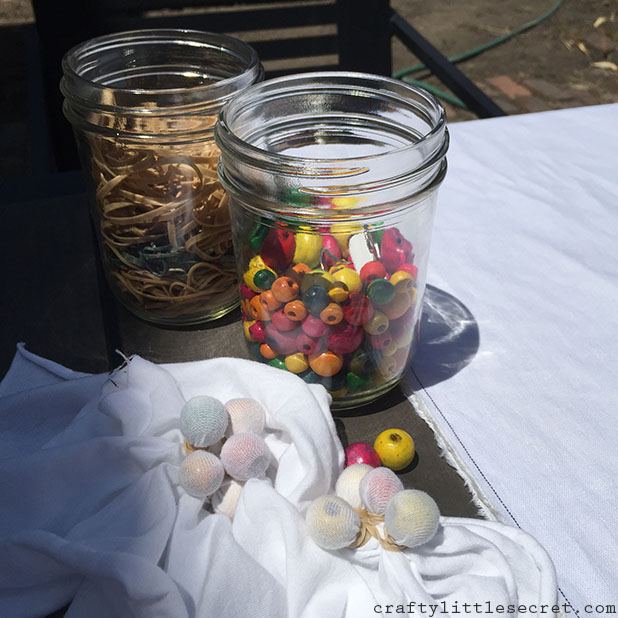
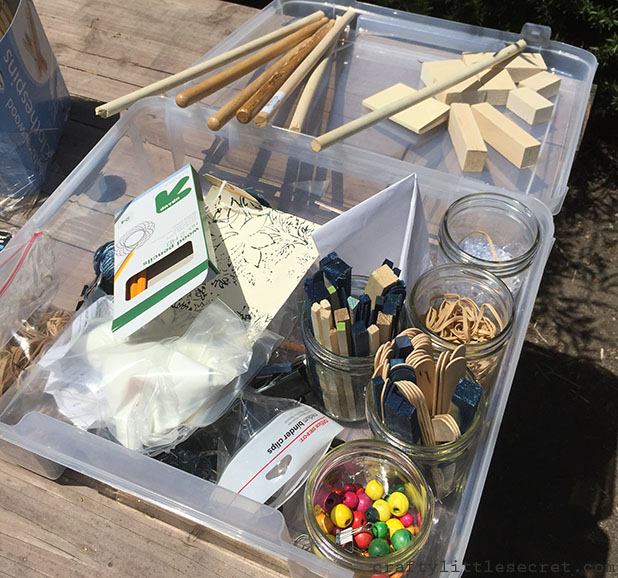
Ryen had a ton of tools that he’d laid out for us to play with, and I was drawn to the little wooden beads.

shibori beadsI wrapped the fabric around individual beads in clusters of 4-6, and wrapped each cluster with an elastic.

Shibori Sampler Scarf - Crafty Little Secret - www.craftylittlesecret.com
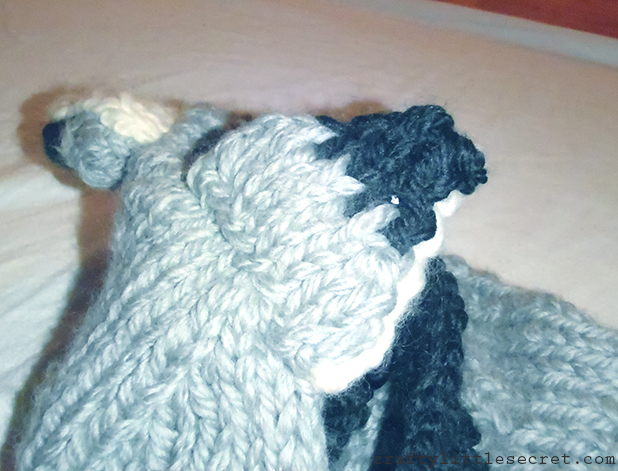
I also tried some popsicle sticks, which I hoped would make stripes, and some plastic furniture coasters held in place with clamps. The tied up cones are a technique known as “kumo” in which the fabric is wrapped around a dowel (or chopstick, in this case) and tied in place using thread or string. Here’s a great example of kumo, that Ryen made:

Kumo Shibori - Crafty Little Secret - www.craftylittlesecret.comAnd here’s how my sampler scarf turned out:

Shibori Sampler Scarf - Crafty Little Secret - www.craftylittlesecret.com

On the left is the pattern that was created by the little wooden bead and elastic clusters. I love it! Very microbial, no? Next to that are the strips created by the popsicle sticks, the kumo twists, and the polk-a-dot pattern on the right was created using the plastic coasters. Since this scarf was made out of a scrap of fabric I had in my stash, there’s a chunk cut out of it on the right. But fear not, I’ve got a plan. So stay tuned for that too!

Anyhoo, that’s all that I dyed, but check out some of the awesome things my friends made!

Shibori butterfly - Crafty Little Secret - www. craftylittlesecret.com

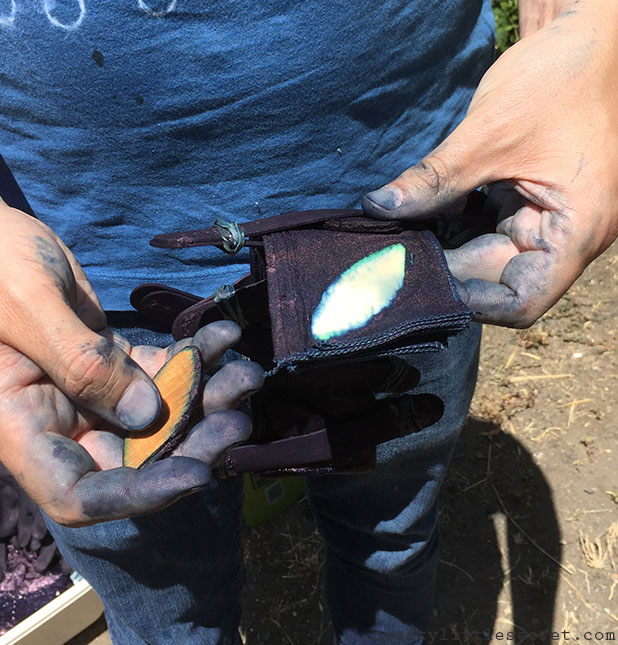
Ryen used these little wooden leaf cut-outs that he found at the hardware store to make the butterfly effect shown below. I really wish I had taken a picture of Kristy’s finished product using the same technique to show how differently different fabrics take the dye.

Shibori Butterfly napkin - Crafty Little Secret - www.craftylittlesecret.com
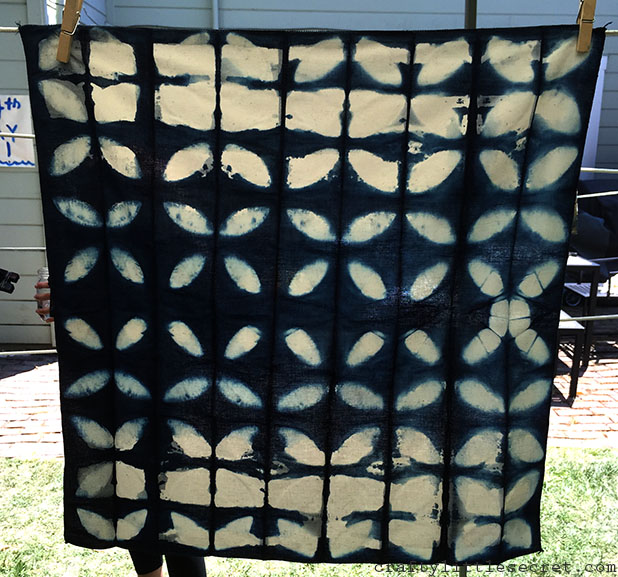
Kristy brought some linen that she cut into 20″x20″ squares to make napkins. You can see in the photos below that the dye penetrated the fabric really, really well making clean sharp lines and consistent dye patterns.

shibori napkin lattice Shibori Napkins - Crafty Little Secret - www.craftylittlesecret.com
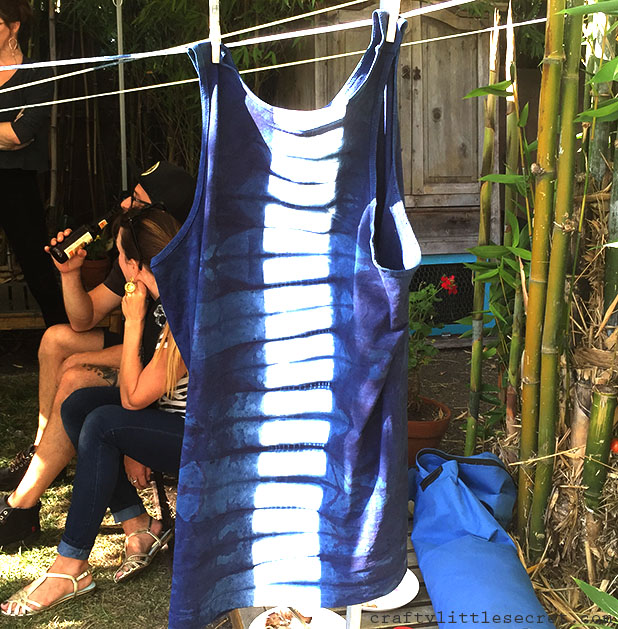
Ryen also played with placement of simple patterns and made the tank top below. The stripe is on the back of the tank top so it makes a really cool spinal effect.

Spine Shibori - Crafty Little Secret - www.craftylittlesecret.com

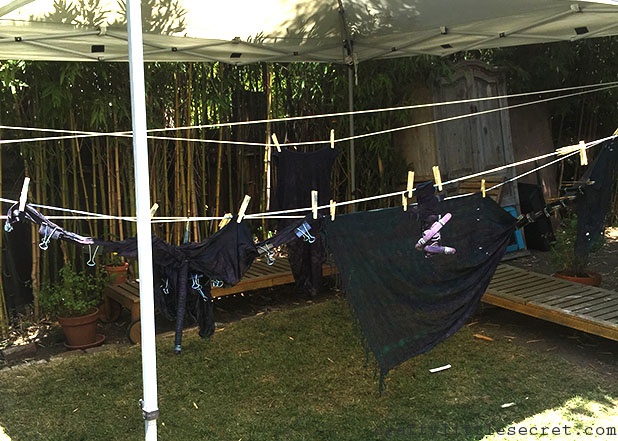
And here it is, all our beautiful work hanging on the line! What a way to spend a lazy Sunday…

Shibori Dying - Crafty Little Secret - www.craftylittlesecret.com


Me-Made May 2015 Roundup (Finally)

Well kids, it’s been a whirlwind Me-Made May this year. So much so, that I’m posting about it halfway through June! I did follow my pledge and wear me-mades everyday, but I didn’t manage to snap pictures of all of them. I also followed my pledge and (almost) finished the pants I’ve been working on (they literally just need a button and a buttonhole and they’re done). I did not, however, follow my pledge to post outfit photos weekly. No sir, I did not.

Anyhoo, without further ado, here’s the roundup:

Me Made May 2015 Roundup


I’ve gotta tell ya, we had some good times this past month, me and my me-mades….

Savannah….we started out the month in Savannah, GA. This dress has never been more perfect for any occasion….

Cal Academy……we checked out the California Academy of Sciences……

Picnic……we had a picnic with friends in Alamo Square…..

Book of Mormon.…….we finally saw Book of Mormon……..

NOLA……and we finished out the month in New Orleans.

Good job to everyone who participated in this year’s Me-Made May. I was pretty slack on my posting (in that I didn’t do it), but I’ve loved seeing everyone else out and about in their me-mades!

Me-Made May ’15

Hello, old friend! It’s been a while.

It’s that time of year again…..Me-Made May! I’m going to try to wear a me-made item every day, but I’m honestly not too sure how it’s going to go. A lot of my handmade wardrobe is on the casual side because I wasn’t working at my peak sewing time, and was working in an academic lab before that (all jeans and bleach stains…). Now I work in an office and need to look at least a little professional every day.

The other confounding factor is that I’ve felt a bit low on sewing mojo lately, for a few reasons. The main one is that I’ve done something terrible and ungodly to my back. It now hates me and occasionally sends shooting pains into my right leg, like lightening bolts into my butt cheek. It is locked in a battle of will against my chiropractor. Time will tell who wins the war. In the meantime, sitting for too long hurts and at the end of the day I’m too exhausted to do much more than flop on my couch.

So this year, my two Me-Made May goals are; 1) to find ways to mix my handmade wardrobe into my work wardrobe, and 2) to get back to the sewing machine. With that in mind, I’m making the following pledge:

 ‘I, Eileen of Crafty Little Secret, sign up as a participant of Me-Made-May ’15. I endeavour to wear one me-made item each day for the duration of May 2015 and to finally finish my half-sewn dress pants’

I’m going to take daily photos and post a weekly update of how I’m doing.

Happy May everyone!

I Dream of Jasper…

Crafty Little Secret - Paprika patterns Jasper dress - www.craftylittlesecret.comEven though I live in California, I still dream of warm cozy clothes in the winter. This winter I had been fantasizing about a funky sweatshirt dress that had some element of style that would make it special. I was thinking kangaroo pocket, I was thinking cowl neck. And I didn’t know it yet, but I was thinking Jasper.

I had pinned Paprika PatternsJasper hoodie before it was a pattern for sale. So imagine my delight when I found that not only had the hoodie been made into a pattern for public consumption, but that the pattern also included a dress and/or cowl option.

Crafty Little Secret - Paprika Patterns Jasper Dress - www.craftylittlesecret.com

In other news, I don’t know what’s with my camera. My photos were just poor quality this shoot 😦

Shortly after I bought the pattern for my Jasper dress, I saw Gillian’s blue version.  Wise woman that she is, Gillian advised me to cut a size smaller than I thought I needed because the pattern runs large. But I laughed in the face of wisdom! Then promptly spent the remainder of my time sizing down the pattern…. Ooops! In the end I took about an inch out of the back seams and all the way down the arms. I also brought the front seams in under the bust, but left them as-is at the actual bust and around the hips.

Extra fabric where I didn’t need it, and none where I did! Despite the pattern’s clear statement that this dress was intended for a 5’7″ frame, my 5’10” self cut the pattern straight out of the package without adding any additional length. I guess I’m not wearing this one to work!

Crafty Little Secret - Paprika Pattern Jasper dress - www.craftylittlesecret.com

Some other pattern instuction that should definitely be heeded, is fabric selection. This pattern requires true heavy sweatshirt fabric to hold up the structure in the neck (or hood), and there are great suggestions on the Paprika Patterns blog to help you find the right stuff. I found mine on Fabric.com and, again, decided to ignore the wisdom of those who came before me that informed me the fabric was lighter in person than it appeared online. That’s ok, I still like it.

I would also advise others to heed the pattern suggestion to use a lighter weight cotton jersey (instead of fleece) for the inner lining of the kangaroo pocket. Even with the lightweight lining, you can still see the lines a little on my dress.

Crafty Little Secret - Paprika Patterns Jasper dress - www.craftylittlesecret.comSpeaking of which, this pattern also marked a delightful first for me – my first welt pocket! I experienced a decided lack of vision with this part of the pattern and just couldn’t quite imagine how it would come together, even after looking at the instructional photos. But, I trusted in the instructions and, perhaps fool-heartedly, cut my pattern without first doing a practice run, and… it worked! My only ‘whoopsie’ was my use of a non-washable marker to mark my fabric pieces without realizing the marks would be visible in the final product. Meh, they’re just specks!

Crafty Little Secret - Paprika Patterns Jasper dress - www.craftylittlesecret.comThe one part of construction that I struggled with a little was top stitching the epaulet. I just found it difficult to sew through the thick layers of sweatshirt without distorting the shape of it. That’s ok, the adorable vintage wooden button I found in Portland a couple years ago will distract the eye from any imperfections! (I knew I was right to hoard random buttons…)

I finished up my dress in a weekend or so and concocted a plan as to what would be the perfect debut for Jasper…..a local sewing meetup at Britex Fabrics! Or, erm, what would have been the perfect debut if I hadn’t written down the wrong time and showed up just as the meetup was ending! Noooooo! But don’t cry for me Argentina, because I showed up at the meetup just in time to still get my 20% off coupon for Britex….which I promptly spent on some gorgeously soft black bamboo rayon (classic wrap dress, here I come!). Suggestions for the perfect wrap dress sewing pattern are welcome….

Crafty Little Secret - Paprika Patterns Jasper dress - www.craftylittlesecret.com


My Big Book of Sewing Awesome (aka My Project Book)

Project Book

I think it was when I was working on my second Mathilde blouse that I realized I needed to start keeping notes on my sewing projects. I remembered that I had to make some alterations to the first version, but couldn’t remember the exact changes I had ended up making and found myself wishing I had written them down somewhere.

And so my Project Book was born.

Each time I start a new sewing project I write down the date I started and all the pattern information, including what size(s) I cut. I will often print out the line drawing from the pattern envelope as well, and make my alteration notes right on the sketch. I love being able to mark up the patterns with my own notes and measurements.

Project BookRecently I have started getting a little more regimented about it and have even started stapling fabric swatches to each project page. I’m still not very textile savvy, so I figure it may come in handy one of these days to have those swatches. I could bring my little book to the fabric store with me and have all the information I need in there, including an example of the type of fabric I’m looking for, if I ever want to replicate a project.

Project Book

A nice little side effect of my project book is that it’s becoming a little trip down sewing memory lane for me. Sometimes I sit and flip through it, reminiscing about all my makes. I love having them all recorded in one place (besides here, lol)!

So how about you, do you keep notes on your projects?


Ahoy, Bronte!

Crafty Little Secret - Jennifer Lauren Vintage Bronte Top - www.craftylittlesecret.comAhoy, Bronte! I’m still in love with my first Bronte top and I’ve been thinking that I need some more long-sleeved t-shirts this winter, so a long-sleeved Bronte was a nautical….ahem, natural….choice.

I’ve been obsessed with nautical prints lately. Maybe it’s because I got married on a boat (well, the actual wedding was on land, but the boat took us there), maybe it’s because we almost moved onto a boat last summer. Or maybe, just maybe, it’s because nautical prints are super cute and super trendy right now. Whatever the reason, I had anchors on the brain and Robert Kaufman was more than happy to oblige with the Laguna Stretch Jersey Knit in Anchors Nautical Navy.

Crafty Little Secret - Jennifer Lauren Vintage Bronte Top - www.craftylittlesecret.com

Based on my last Bronte top, I knew that I need to cut 2″ out of the hips, so I cut a size 20 in the bust and waist then scaled down to an 18 for the hips. I also knew that I needed to add 2″ in length to the body, so I assumed that I needed to add 2″ in the sleeve length as well. Not so! Once the shirt was assembled, I promptly cut that 2″ right back out, did a double turn hem and still have plenty of length in the sleeves!

Crafty Little Secret - Jennifer Lauren Vintage Bronte Top - www.craftylittlesecret.comMy obsession with the twin needle continues. It just makes such a lovely edge, how could I resist?

Unfortunately, it makes it quite a pain in the butt to unpick it if you make a mistake.

So imagine my dismay when I realized that I had somehow managed to turn my hem the wrong way when I was hemming the bottom of the shirt. Duh! I thought about unpicking the entire circumference of the shirt (which, of course, is how long it took me to realize my error) for about a millisecond before I rejected the idea as ridiculous and just did a triple turned hem instead. The result is a bulky hem and a shirt that is about an inch shirt than I had intended. But you know, that’s still way better than unpicking them hem. Ammiright?

Crafty Little Secret - Jennifer Lauren Vintage Bronte Top - www.craftylittlesecret.comThe other thing I unfortunately struggled with this time was the neckline. In fact, it took me three tries before I got it right! When I sewed my Sangria Bronte top, I had forgotten to transfer the markings for neckline placement onto my fabric, so I kind of just estimated and moved it around until it all fit together. This time, I diligently transferred the pattern markings to my fabric, but when I tried it on for the first time the neckline was gaping so much that I thought I must have sewed it backwards!

Rather than doing something reasonable, like double checking with the pattern piece, I immediately unpicked the whole neckline and switched which piece overlapped which at the shoulder. When I tried it on that time, I realized “Oh. Now this is sewn backwards”.

Unpick, unpick, unpick.

Finally I hypothesized that I just needed to tighten the neckline up a little so I pulled each piece so that it overlapped the other by about an inch more than suggested by the pattern. This meant though, that now the sleeve didn’t line up properly with the armscye. Lucky for me that a little gather makes pretty much any sleeve more adorable because I sure as heck wasn’t unpicking that thing again!

Crafty Little Secret - Jennifer Lauren Vintage Bronte Top - www.craftylittlesecret.comIf only I had noticed, at some point before I sewed it backwards, that I had sewn the whole shirt using a regular needle instead of a stretch needle!

Geeze Louise! As I’m writing this post I’m wondering what the heck I was thinking while I was trying to sew this top!

Unfortunately, you can still see the faint trace of the holes from the top-stitching made during the second neckline attempt when I sewed the front bodice piece over the back (oh yes, I top-stitched that error and everything), most visible in the white of the neckline in the close up photo above. But really, it’s not that noticeable when I’m wearing it. And it certainly doesn’t detract from the adorableness of this top. And I’m hoping it might bounce back a little after I wash the shirt. So there’s still that hope.

Crafty Little Secret - Jennifer Lauren Vintage Bronte Top - www.craftylittlesecret.com

This fabric is a bit lighter weight and has a bit more stretch than the knit I used for my Sangria Bronte, and I’ve found it doesn’t make as much of a flattering shape as my first top from the back view. That’s not to say that it makes an unflattering shape. On the contrary, I think it looks quite nice. Just that it’s not as flattering as the first.

Crafty Little Secret - Jennifer Lauren Vintage Bronte Top - www.craftylittlesecret.com

All in all, I love my nautical Bronte! I think the choice of the white jersey for the neckline really brightens it up around my face and brings attention to the shoulder detail. I’m already pairing my nautical Bronte with my new Miette skirt in my head and wondering if a pair of red tights would make it all just too “outfitty”? Thoughts????

Willy the Wily….WOLF!!

****UPDATE**** I’ve received several requests to share the pattern since it seems to be no longer available on Ravelry. Unfortunately, the pattern is not mine to share. I’d recommend trying to contact the designer directly through Ravelry if you’d like the pattern.


Crafty Little Secret - Willy the Wily Wolf sweater - www.craftylittlesecret.com
It’s become a bit of a tradition for me to knit my nephew a sweater for Christmas. He’ll be 2 in February so this year I wanted to make him something that he would think was fun. I somehow got it into my head that I wanted to make him a little grey wolf sweater, and the closest thing I could find that was close to what I was imagining was the Willy the Wily Fox knitting pattern. Turns out it’s pretty easy to convert a fox into a wolf.

I really wanted a soft, washable wool that would be nice and warm and feel soft on his skin, but I also wanted flecks of different shades of grey in the yarn. That, apparently, is a tall order. The pattern called for super bulky weight yarn but I just couldn’t find anything I liked in that weight. Why do they make so many scratchy yarns??? I ended up buying something lighter and doubling up the strands as I knit it. Unfortunately, I didn’t write down what yarn I bought so I can’t share that with you. Just trust me that it’s soooooooooooooooooooft.

And expensive. This might be the last year Ben gets a sweater. The little dude grows so fast that I’m sure it won’t fit him next year and I wasn’t that happy with the fit from the pictures my brother sent me. (The hood seems small and tight around his face, though now that I look back at some of the photos of the pattern on Ravelry, I think I should have expected that) It’s a lot of money to spend on something that he’s not really old enough to appreciate and won’t last very long.

Willy the Wily Wolf Sweater - Crafty Little Secret  - www.craftylittlesecret.com

I’m also not sure that I really love knitting sweaters. I don’t know what it is, but I’m truly terrible at assembling them. This sweater looked, ooooooooh about a million times better before I assembled it and picked up the stitches to add the dark trim. I even went through the effort of carefully blocking each piece. I might be a scarf/hat/mitten kinda girl. Hey, kids need mittens too, right? Maybe we’ll be scaling down next year.

Crafty Little Secret - Willy the Wily Wolf Sweater - www.craftylittlesecret.comThe pattern came together pretty well, though it’s a little light on the definitions and instructions. For instance, sometimes the pattern will just jump from Row 17 to like, row 38 or something. That tripped me up and I thought rows were missing until I realized that meant I was just supposed keep knitting as before for those missing rows. But really, how hard would it be to add an extra line that said “18-37: Knit all even rows, purl all odd rows” or whatever? Just to avoid confusion for dummies like me. The pattern did include instructions for picking up stitches and sewing up seams.

Crafty Little Secret - Willy the Wily Wolf Sweater - www.craftylittlesecret.comI used the buttons that I bought in Portland just over a year ago. I think they look cute on a little boy’s sweater and I’m not sure what else I would have used them for.

So there you have it. Willy the Wily Wolf. Cute sweater for a cute kid and would definitely be a great pattern a little more adept at assembly than I.