Category Archives: For Baby

Willy the Wily….WOLF!!

****UPDATE**** I’ve received several requests to share the pattern since it seems to be no longer available on Ravelry. Unfortunately, the pattern is not mine to share. I’d recommend trying to contact the designer directly through Ravelry if you’d like the pattern.


Crafty Little Secret - Willy the Wily Wolf sweater - www.craftylittlesecret.com
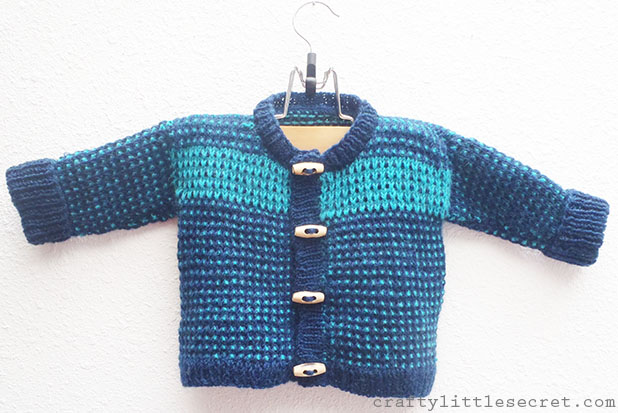
It’s become a bit of a tradition for me to knit my nephew a sweater for Christmas. He’ll be 2 in February so this year I wanted to make him something that he would think was fun. I somehow got it into my head that I wanted to make him a little grey wolf sweater, and the closest thing I could find that was close to what I was imagining was the Willy the Wily Fox knitting pattern. Turns out it’s pretty easy to convert a fox into a wolf.

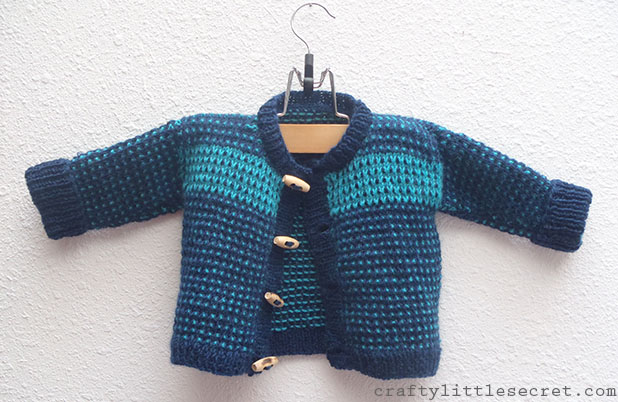
I really wanted a soft, washable wool that would be nice and warm and feel soft on his skin, but I also wanted flecks of different shades of grey in the yarn. That, apparently, is a tall order. The pattern called for super bulky weight yarn but I just couldn’t find anything I liked in that weight. Why do they make so many scratchy yarns??? I ended up buying something lighter and doubling up the strands as I knit it. Unfortunately, I didn’t write down what yarn I bought so I can’t share that with you. Just trust me that it’s soooooooooooooooooooft.

And expensive. This might be the last year Ben gets a sweater. The little dude grows so fast that I’m sure it won’t fit him next year and I wasn’t that happy with the fit from the pictures my brother sent me. (The hood seems small and tight around his face, though now that I look back at some of the photos of the pattern on Ravelry, I think I should have expected that) It’s a lot of money to spend on something that he’s not really old enough to appreciate and won’t last very long.

Willy the Wily Wolf Sweater - Crafty Little Secret  - www.craftylittlesecret.com

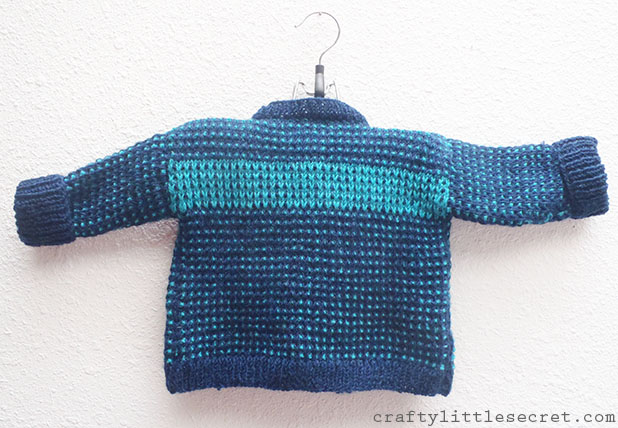
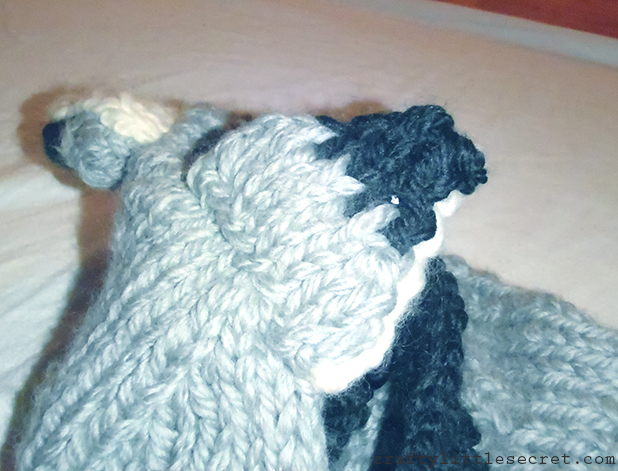
I’m also not sure that I really love knitting sweaters. I don’t know what it is, but I’m truly terrible at assembling them. This sweater looked, ooooooooh about a million times better before I assembled it and picked up the stitches to add the dark trim. I even went through the effort of carefully blocking each piece. I might be a scarf/hat/mitten kinda girl. Hey, kids need mittens too, right? Maybe we’ll be scaling down next year.

Crafty Little Secret - Willy the Wily Wolf Sweater - www.craftylittlesecret.comThe pattern came together pretty well, though it’s a little light on the definitions and instructions. For instance, sometimes the pattern will just jump from Row 17 to like, row 38 or something. That tripped me up and I thought rows were missing until I realized that meant I was just supposed keep knitting as before for those missing rows. But really, how hard would it be to add an extra line that said “18-37: Knit all even rows, purl all odd rows” or whatever? Just to avoid confusion for dummies like me. The pattern did include instructions for picking up stitches and sewing up seams.

Crafty Little Secret - Willy the Wily Wolf Sweater - www.craftylittlesecret.com
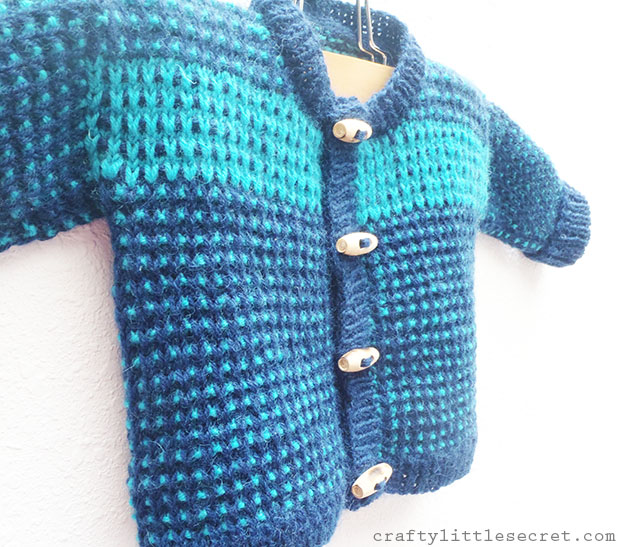
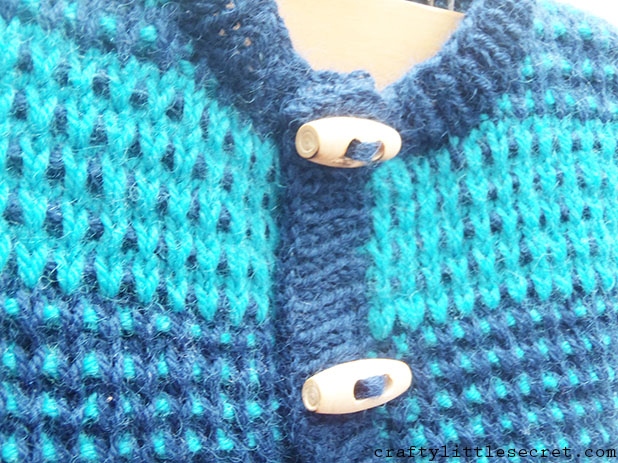
I used the buttons that I bought in Portland just over a year ago. I think they look cute on a little boy’s sweater and I’m not sure what else I would have used them for.

So there you have it. Willy the Wily Wolf. Cute sweater for a cute kid and would definitely be a great pattern a little more adept at assembly than I.

Advertisement

Summer Night Lights Geranium Dress

Geranium numero deux.

Crafty Little Secret - Summer Night Lights, Geranium Dress - craftylittlesecret.comThis one is a surprise gift for a friend’s little girl. I’ll be visiting next month and staying with them for a few days so I thought it would be a nice way to say ‘Thanks’. I went pretty simple on this one: simple neckline, no sleeves. Though I did add some piping to give a little separation to the bodice. 

Crafty Little Secret - Summer Night Lights, Geranium Dress - craftylittlesecret.comI actually made the piping myself and it was my first time doing so! I figured it would be too much of a pain in the butt to find matching piping so I just went ahead and cut about an inch and a half off the bottom of some leftover fabric and sewed up my own. It did end up getting a little wrinkled and bunched up in spots, I think either because I didn’t stitch tightly enough against the piping innards or because I improvised the innards (some of it was actually piping cord and some of it was just some elastic cord I had lying around that was about the same diameter). I probably should have exercised a little patience and watched a tutorial or two, but all in all I think it turned out pretty well.

Crafty Little Secret - Summer Night Lights, Geranium Dress - craftylittlesecret.comI was taking forever trying to decide which fabric to buy (seriously consider this Fantasy Forest print from Michael Miller) and when I showed my husband the options he was like, “Pfft. No contest.” So I went with this Summer Night Lights print by Michael Miller. The fabric was a double-edged panel which was great because I only had to buy 1 yard of fabric total to sew this dress up in size 2T.

Crafty Little Secret - Summer Night Lights, Geranium Dress - craftylittlesecret.comAs with the last time I made the Geranium dress, since this was for a gift I wanted to finish it nicely. I also wanted to keep it a nice, cool summer dress and didn’t want to line it. Instead, I opted to finish the seam allowances with ribbon, a first for me!Crafty Little Secret - Summer Night Lights, Geranium Dress - craftylittlesecret.comI’ve always admired how lovely finished seams look on other people’s projects and I gotta tell ya, I think it’s looking pretty slick here too. Maybe I’ll start finishing more of my projects this way.

Crafty Little Secret - Summer Night Lights, Geranium Dress - craftylittlesecret.comI opted to use pink buttons on the back closure because I thought it would nicely highlight the pink flowers in the bottom border print. Originally I wanted the buttons to be little pink flowers but they were all sold out of the ones I wanted at the fabric store and I’m far too impatient to look elsewhere!

Crafty Little Secret - Summer Night Lights, Geranium Dress - craftylittlesecret.com

Fabric: Michael Miller’s Wee Wander Summer Night Lights, Double Border Twilight
S
ource: Fabric.com
Yardage: 1 yard
Pattern: Made By Rae, Geranium Dress

Hot Air Balloon Themed Baby Shower Gifts

For someone who doesn’t have kids I sure spend a lot of time sewing for ’em! I actually really enjoy it. The projects are so small they are easy to finish before I got bored. Most of my friends who’ve had kids live back home in Canada so I usually just make my felt embroidered onesies that are easy to mail back home. But now some of my city friends are pregnant and I’ve gone a little crazy sewing up a hot air balloon themed baby shower gift! Hot air balloon DIY baby shower gift The hot air balloons are a totally random theme and I hadn’t meant to go crazy with them, but I just kept sewing! See, it started with the quilt. I was hunting around for a cute gender neutral fabric bundle and fell in love with the Blown Away collection by Josephine Kimberling. blown away fabric bundle I thought the hot air balloon print was the cutest and used that as the backing for the quilt I made, then had a bunch left over. So then I made a onesie to match. And then I thought how perfectly the green matched some left over flannel from my Halloween costume and decided to make some burp cloths. hot air balloon baby onesieTo make the hot air balloon applique I used the same technique I used when I made plaid elbow patches for my husband’s sweater. It looked a little plain so I embroidered some happy puffy clouds around the balloon to add a some interest. hot air balloon baby onesie detailThe burp cloths are just ~18″x25″ pieces of flannel with a strip of the balloon fabric sewn across the end for some detail. From what I’ve read, people seem to like flannel for burp cloths because it stays in place and is more absorbent than something like quilting cotton. hot air balloon DIY burp cloth I caught myself getting a bit carried away with these. As I was thinking about making some binding to go all the way around the cloth I remembered; I am sewing something whose sole purpose is to be barfed on. So I reined it in a little and contented myself instead with a nice neat double turned hem all the way around. Hot air balloon baby quilt frontIn my humble opinion, the quilt is the star of this baby bundle! It is my second quilt but my first was a t-shirt quilt. Sewing quilts with actual quilting fabric is soooooo much easier than with knits! I knew I didn’t want a pattern that was too finnicky so I chose this pattern from Two Little Banshees and it came together in two days – one day to cut and sew and one day to bind and quilt! To do the binding I pieced together leftover bits from the quilt front and followed this tutorial for making an invisible joint and mitered corners. It was a really helpful video! hot air balloon baby quilt detail I opted for super simple quilting and only had to unpick one extremely wonky row of stitches that was over two inches off from one side of the quilt to the other! I think you can see the quilting better on the back; hot air balloon baby quilt backI hope my friends like hot air balloons!!!!!!!!!

Ben’s Birthday Sweater!

My adorable little nephew had his first birthday this weekend and while I didn’t get his present mailed in time, I at least finished it in time for his birthday!

Paton's Hooded Cardigan knitting patternI really wanted to make him a little hoodie so I chose the free Paton’s Hooded Cardigan pattern in size 12-18 mo. (fingers crossed that it fits him!). Clearly, however,  this sweater does not have a hood. I ran out of yarn.

Paton's Hooded Cardigan knitting pattern size 12-18 moI was commissioned to make a sweater for my nephew by a friend of my brother’s who brought some amazing lamb’s wool back from Australia, so I only had a finite amount of yarn. It was hard to guess how much I’d need since I was altering the suggested color blocking and I think I made the arms too long. Oh well, it’s still pretty darn cute without the hood too.

Paton's Hooded Cardigan no hoodI carried the stripe along the chest and back but didn’t include it in the sleeves. I’d never knit this pattern before (and this is only my second sweater) so I wasn’t totally sure about the construction and how it would all come together. I figured if I did the stripe on the sleeves and it didn’t match up it would make the whole sweater look wonky so it was better to just leave it off.

Baby cardigan knitting patternI used Moda Vera Pure Wool 8 ply, the blue is colorway 47 and the teal is colorway 37. Do you think I would keep track of how much yarn I actually did use in case someone wanted to replicate this? No, of course not. I definitely don’t knit as much as I sew so remembering what details I should be tracking is a bit of a learning experience for me.

The collar was relatively easy to add, which was nice because I’d never made an alteration like that to a knitting pattern before (wipes brow with sigh of relief). I just followed the pattern and cast off the neckline as detailed in the pattern. Instead of adding a hood though, I counted the number of stitches around the neckline (I think I had 62), then I made a K1, P1 [repeat] rib that was 6 rows long and sewed it on.Paton's Hooded Cardigan baby knitting patternIn addition to the collar alteration, another first for me with this project was blocking! I wrapped a bulletin board in a towel to use as my base then spritzed the sweater with a bit of cool water and pinned it in place on the board. I probably should have blocked each piece individually before assembling the sweater, but I didn’t think of it then. So instead I blocked in two stages; the body of the sweater first, then the arms in a second step. The blocking definitely helped keep the collar from folding over and corrected some wonkiness along the button placket.

[ASIDE: All this knitting talk reminds me – you can find me on Ravelry as CraftyLilSecret].

Happy birthday Ben! Sorry your present is late, but something tells me you won’t hold it against me…..

I thought maybe the adorable pink skull onesie I posted a tutorial for here was making all the little baby boys jealous, so I’ve come up with a little blue skull for them!

Boy skull onesieSkull onesie for boy

Skull onesie for boyI love these things!! Too cute!

In other news, I feel like I’ve been struggling to keep up with crafting and posting lately. I’ve had lots of presents to make that I can’t post because I don’t want to ruin the surprise for the recipients!! BUT. I wanted to let you know that I have exciting crafty news on the horizon that has been taking up a bit of my time. I’m hoping to let you in on the news later this week or next! Squee!


Hand-Sewn Felt Embroidered Baby Onesies: Tutorial

Since all my friends simultaneously decided to hop on the baby train about a year ago, I’ve been making adorable (if I do say so myself!) hand-sewn onesies for the little booger machines. I’ve given a sneak peak before in my previous post showing what I made my nephew for Christmas and now it’s time for a tutorial!

This week I made a couple onesies for some cute little baby girls and took pictures along the way. Check out this cute skull with a bow onesie!

OLYMPUS DIGITAL CAMERAHere’s what you’ll need for this project;

SAMSUNG

Materials List:
– onesie
– felt
– embroidery floss
– scissors
– fabric glue

Seems like for a new born baby you’d buy the newborn size (0-3 mos.) onesie, right? Not always. Some of my friends have birthed behemoths….er….I mean, healthy-weight…..babies that actually never fit the 0-3 mos. clothing size. You might want to consider purchasing a 3-6 mos. onesie, the baby can always grow into it!

When getting started I take the time to first sketch my pattern out on a piece of paper. This gives the nice advantage of reproducibility if I save the paper template for future projects.

OLYMPUS DIGITAL CAMERAUse this template to trace out your pattern onto a square of felt and cut the pattern.

OLYMPUS DIGITAL CAMERAOLYMPUS DIGITAL CAMERAAlthough I reinforce the felt with embroidery, I always like to first adhere the felt to the onesie with fabric glue. This helps to hold the applique in place while I’m sewing and adds a little extra strength to the final product.

OLYMPUS DIGITAL CAMERAI use bottled glue instead of spray glue because I find that when working with small pieces of fabric like this, the spray glue can get a little messy. I try to keep the glue away from the edges where I’ll be sewing because putting the needle and thread through the glue repeatedly really gums it up and leads to tangling while trying to embroider.

Center your felt cutout on the onesie. I usually try to position it so that it will center on the child’s chest, but it can be pretty cute to sew something to the bum of the onesie.

OLYMPUS DIGITAL CAMERAFor both a decorative detail and additional strength, I embroider around the edge of the felt with a complimentary color of embroidery floss.

Standard embroidery floss is actually composed of 6 thin threads. I find it is too difficult to work with the floss at full thickness so I separate out 3 strands to embroider with. Just hold on to the 3 you want to use, gently pull on the 3 you’re setting aside and it should separate pretty easily (the longer your thread, the more likely it is to tangle).

OLYMPUS DIGITAL CAMERAOLYMPUS DIGITAL CAMERAI used blanket stitch to embroider around the edges of the felt applique. Blanket stitch is a really easy way to add a cute embellishment that I’ve shown before in my double-sided napkin post.

To do blanket stitch, first come up through the fabric from the bottom, then put the needle back down through the fabric about 1 cm over and 1 cm down (or whatever spacing you’d like), and pull the floss through. Leave a little slack in the floss, don’t pull it all the way through.

OLYMPUS DIGITAL CAMERAWhen bringing the needle back up, bring it up on the edge of the felt across from where you brought the needle down. Make sure to bring the needle up inside the loop of floss left on the top. Pull taught.

OLYMPUS DIGITAL CAMERA

OLYMPUS DIGITAL CAMERAHere’s a nice YouTube video describing the process if you found that a bit confusing.

Embroider around all edges of the felt to give it a cute hand-made look.

OLYMPUS DIGITAL CAMERA

OLYMPUS DIGITAL CAMERAI wanted to add just a touch more sweetness to this little skull so I also cut out a bow in pale pink felt. Just cut two pieces, one larger oval and one thin rectangle.

OLYMPUS DIGITAL CAMERATo form the bow, pinch the oval in half along the long edge, then fold the edges back onto themselves.

OLYMPUS DIGITAL CAMERA

OLYMPUS DIGITAL CAMERAI added a little stitch at this point to hold it together while I used the thin rectangle segment to wrap around the center of the bow and stitched it all together.

OLYMPUS DIGITAL CAMERAHand-stitch the bow to the skull and you’ve got one adorable onesie!!

OLYMPUS DIGITAL CAMERAI’ve probably made about 20 of these over the past year or so. Once you get the hang of it, it usually only takes about 1.5-2 hours to pull a onesie together!

Here are a few other ones that I’ve made over the past year…

SAMSUNG

SAMSUNG

SAMSUNG

SAMSUNG

SAMSUNG

SAMSUNGI’ve linked this onto parties over at Thirty Handmade Days, So You Think You’re Crafty and Nap Time Crafters. Head on over and see what other crafters have linked to the parties!


Baby Name Art: Felt Embroidery DIY

A friend of mine just had a gorgeous baby girl: Stella Joy! My go-to baby gift is normally a set of felt applique onesies (tutorial, one day!), but I really dropped the ball with baby Stella and before I knew it….she was here!

I decided to branch out a bit and, inspired by some things I found on Pinterest here, here and here, I made Stella some baby name art. I’m so happy with how it turned out and I hope her parents love it too!

OLYMPUS DIGITAL CAMERAThis project wasn’t too difficult, but all the stitching around the name took a lot longer than I expected!

To make this, all you’ll need is;

– an embroidery hoop (mine was 16″)
– one sheet each of green, white, pink, and blue felt
– white and pink seed beads
– one skein each of white, black, blue and pink embroidery floss
– two skeins of green embroidery floss
– lightweight cotton/muslin (18-20″ square)

OLYMPUS DIGITAL CAMERAI first cut a large circle from the blue felt, about 1″ diameter smaller than the embroidery hoop and, with muslin secured in the hoop, sewed the blue felt to the white cotton backing using the blanket stitch with blue embroidery floss. I then sewed the green felt on just as I had the blue.

To make the name, I cut paper stencils and held them in place with straight pins while I gently traced around them with a felt pen. (I’m not sure why the color is off in these couple photos, the green is really more of a soft mint rather than the harsh lime it appears here).

OLYMPUS DIGITAL CAMERAOnce I had the name traced onto the fabric I sewed around it using a simple backstitch.

OLYMPUS DIGITAL CAMERAThe grassy embroidery effect around the name was created by sewing small straight stitches in a random pattern about a centimeter around each letter. I diluted the stitches toward the edge of the letters to try to give the impression of grass.

OLYMPUS DIGITAL CAMERAOLYMPUS DIGITAL CAMERAOLYMPUS DIGITAL CAMERAInspired by something I’d seen on Pinterest I used concentric circles cut out of felt to make some sheep and flowers, adding a seed bead to the center of each for a nice girly touch.

OLYMPUS DIGITAL CAMERAOLYMPUS DIGITAL CAMERA

OLYMPUS DIGITAL CAMERA

OLYMPUS DIGITAL CAMERAThe little sheep legs were made using backstitch and the heads were a simple satin stitch. The expanse of blue sky seemed a little vacant when I was done and I was worried clouds would compete with the sheep, so I added a little heart embroidered on using blanket stitch.

OLYMPUS DIGITAL CAMERAWith the front finished, I wanted to make sure the back looked just as polished, so I tried to finish it as nicely as I could (without wasting too much time on it). Unfortunately, I didn’t take pictures of the process because I was going to just link to another tutorial on a blog I frequent. When I went back to look at it though, I realized that I didn’t actually follow it at all and made up my own method instead after I’d already finished without taking any pictures….whoops!

OLYMPUS DIGITAL CAMERA

I cut the excess backing fabric away leaving about a 2″ border. The I ran my needle through it very loosely gathering it toward the center of the backing. I cut a circle from felt about and inch smaller in diameter than the embroidery hoop and attached it to the gathered backing using blanket stitch.OLYMPUS DIGITAL CAMERAAnd that’s about it! Hope Stella likes it! 🙂

OLYMPUS DIGITAL CAMERA