Category Archives: Indie Sewing Patterns

Ahoy, Bronte!

Crafty Little Secret - Jennifer Lauren Vintage Bronte Top - www.craftylittlesecret.com
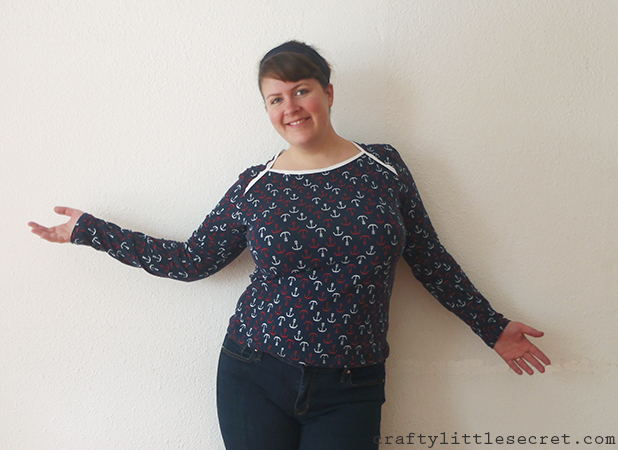
Ahoy, Bronte! I’m still in love with my first Bronte top and I’ve been thinking that I need some more long-sleeved t-shirts this winter, so a long-sleeved Bronte was a nautical….ahem, natural….choice.

I’ve been obsessed with nautical prints lately. Maybe it’s because I got married on a boat (well, the actual wedding was on land, but the boat took us there), maybe it’s because we almost moved onto a boat last summer. Or maybe, just maybe, it’s because nautical prints are super cute and super trendy right now. Whatever the reason, I had anchors on the brain and Robert Kaufman was more than happy to oblige with the Laguna Stretch Jersey Knit in Anchors Nautical Navy.

Crafty Little Secret - Jennifer Lauren Vintage Bronte Top - www.craftylittlesecret.com

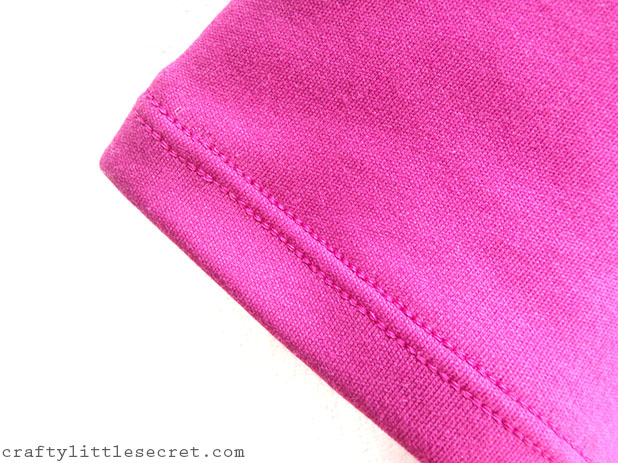
Based on my last Bronte top, I knew that I need to cut 2″ out of the hips, so I cut a size 20 in the bust and waist then scaled down to an 18 for the hips. I also knew that I needed to add 2″ in length to the body, so I assumed that I needed to add 2″ in the sleeve length as well. Not so! Once the shirt was assembled, I promptly cut that 2″ right back out, did a double turn hem and still have plenty of length in the sleeves!

Crafty Little Secret - Jennifer Lauren Vintage Bronte Top - www.craftylittlesecret.com
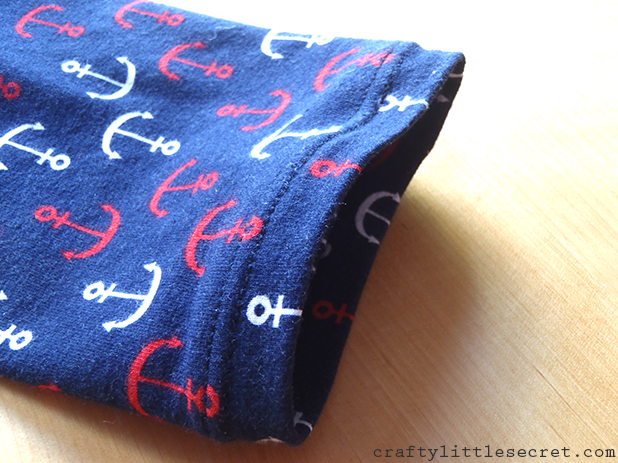
My obsession with the twin needle continues. It just makes such a lovely edge, how could I resist?

Unfortunately, it makes it quite a pain in the butt to unpick it if you make a mistake.

So imagine my dismay when I realized that I had somehow managed to turn my hem the wrong way when I was hemming the bottom of the shirt. Duh! I thought about unpicking the entire circumference of the shirt (which, of course, is how long it took me to realize my error) for about a millisecond before I rejected the idea as ridiculous and just did a triple turned hem instead. The result is a bulky hem and a shirt that is about an inch shirt than I had intended. But you know, that’s still way better than unpicking them hem. Ammiright?

Crafty Little Secret - Jennifer Lauren Vintage Bronte Top - www.craftylittlesecret.com
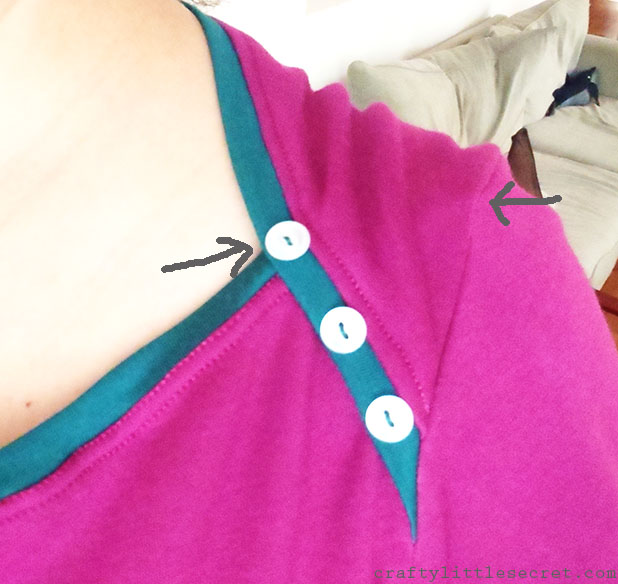
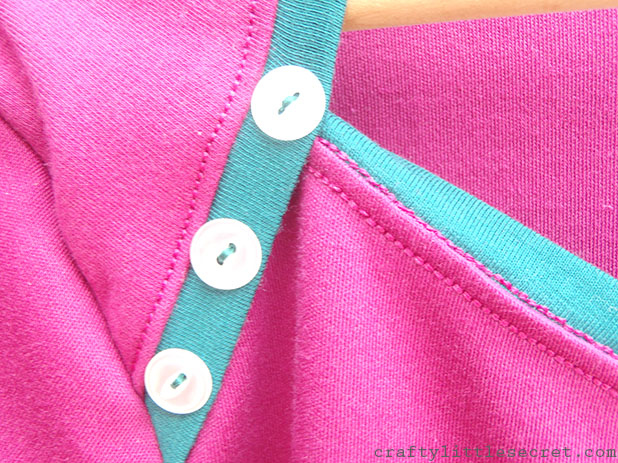
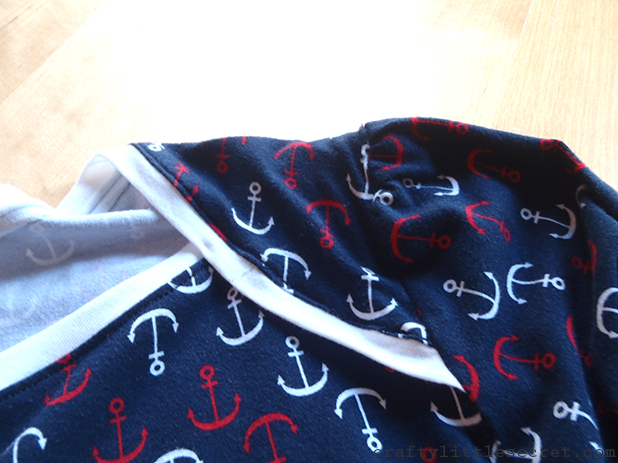
The other thing I unfortunately struggled with this time was the neckline. In fact, it took me three tries before I got it right! When I sewed my Sangria Bronte top, I had forgotten to transfer the markings for neckline placement onto my fabric, so I kind of just estimated and moved it around until it all fit together. This time, I diligently transferred the pattern markings to my fabric, but when I tried it on for the first time the neckline was gaping so much that I thought I must have sewed it backwards!

Rather than doing something reasonable, like double checking with the pattern piece, I immediately unpicked the whole neckline and switched which piece overlapped which at the shoulder. When I tried it on that time, I realized “Oh. Now this is sewn backwards”.

Unpick, unpick, unpick.

Finally I hypothesized that I just needed to tighten the neckline up a little so I pulled each piece so that it overlapped the other by about an inch more than suggested by the pattern. This meant though, that now the sleeve didn’t line up properly with the armscye. Lucky for me that a little gather makes pretty much any sleeve more adorable because I sure as heck wasn’t unpicking that thing again!

Crafty Little Secret - Jennifer Lauren Vintage Bronte Top - www.craftylittlesecret.comIf only I had noticed, at some point before I sewed it backwards, that I had sewn the whole shirt using a regular needle instead of a stretch needle!

Geeze Louise! As I’m writing this post I’m wondering what the heck I was thinking while I was trying to sew this top!

Unfortunately, you can still see the faint trace of the holes from the top-stitching made during the second neckline attempt when I sewed the front bodice piece over the back (oh yes, I top-stitched that error and everything), most visible in the white of the neckline in the close up photo above. But really, it’s not that noticeable when I’m wearing it. And it certainly doesn’t detract from the adorableness of this top. And I’m hoping it might bounce back a little after I wash the shirt. So there’s still that hope.

Crafty Little Secret - Jennifer Lauren Vintage Bronte Top - www.craftylittlesecret.com

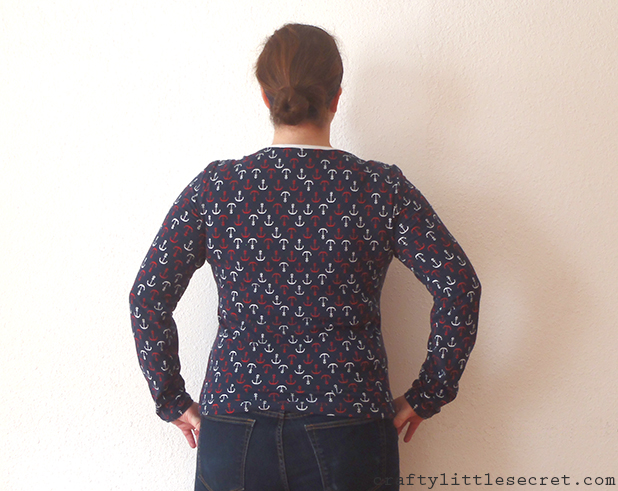
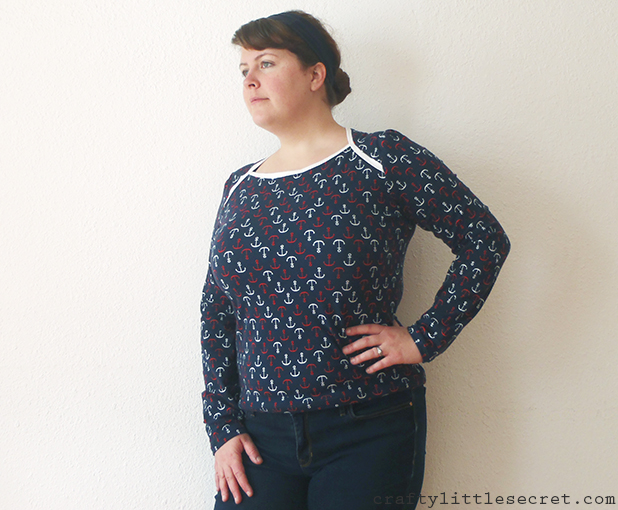
This fabric is a bit lighter weight and has a bit more stretch than the knit I used for my Sangria Bronte, and I’ve found it doesn’t make as much of a flattering shape as my first top from the back view. That’s not to say that it makes an unflattering shape. On the contrary, I think it looks quite nice. Just that it’s not as flattering as the first.

Crafty Little Secret - Jennifer Lauren Vintage Bronte Top - www.craftylittlesecret.com

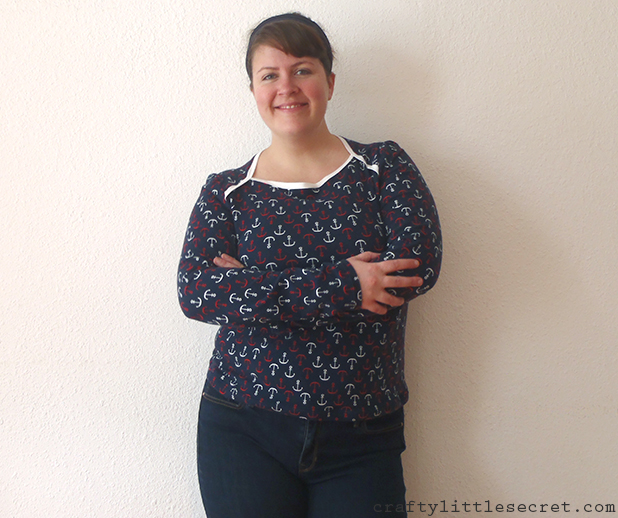
All in all, I love my nautical Bronte! I think the choice of the white jersey for the neckline really brightens it up around my face and brings attention to the shoulder detail. I’m already pairing my nautical Bronte with my new Miette skirt in my head and wondering if a pair of red tights would make it all just too “outfitty”? Thoughts????

Advertisement

Summer Night Lights Geranium Dress

Geranium numero deux.

Crafty Little Secret - Summer Night Lights, Geranium Dress - craftylittlesecret.comThis one is a surprise gift for a friend’s little girl. I’ll be visiting next month and staying with them for a few days so I thought it would be a nice way to say ‘Thanks’. I went pretty simple on this one: simple neckline, no sleeves. Though I did add some piping to give a little separation to the bodice. 

Crafty Little Secret - Summer Night Lights, Geranium Dress - craftylittlesecret.comI actually made the piping myself and it was my first time doing so! I figured it would be too much of a pain in the butt to find matching piping so I just went ahead and cut about an inch and a half off the bottom of some leftover fabric and sewed up my own. It did end up getting a little wrinkled and bunched up in spots, I think either because I didn’t stitch tightly enough against the piping innards or because I improvised the innards (some of it was actually piping cord and some of it was just some elastic cord I had lying around that was about the same diameter). I probably should have exercised a little patience and watched a tutorial or two, but all in all I think it turned out pretty well.

Crafty Little Secret - Summer Night Lights, Geranium Dress - craftylittlesecret.comI was taking forever trying to decide which fabric to buy (seriously consider this Fantasy Forest print from Michael Miller) and when I showed my husband the options he was like, “Pfft. No contest.” So I went with this Summer Night Lights print by Michael Miller. The fabric was a double-edged panel which was great because I only had to buy 1 yard of fabric total to sew this dress up in size 2T.

Crafty Little Secret - Summer Night Lights, Geranium Dress - craftylittlesecret.comAs with the last time I made the Geranium dress, since this was for a gift I wanted to finish it nicely. I also wanted to keep it a nice, cool summer dress and didn’t want to line it. Instead, I opted to finish the seam allowances with ribbon, a first for me!Crafty Little Secret - Summer Night Lights, Geranium Dress - craftylittlesecret.comI’ve always admired how lovely finished seams look on other people’s projects and I gotta tell ya, I think it’s looking pretty slick here too. Maybe I’ll start finishing more of my projects this way.

Crafty Little Secret - Summer Night Lights, Geranium Dress - craftylittlesecret.comI opted to use pink buttons on the back closure because I thought it would nicely highlight the pink flowers in the bottom border print. Originally I wanted the buttons to be little pink flowers but they were all sold out of the ones I wanted at the fabric store and I’m far too impatient to look elsewhere!

Crafty Little Secret - Summer Night Lights, Geranium Dress - craftylittlesecret.com

Fabric: Michael Miller’s Wee Wander Summer Night Lights, Double Border Twilight
S
ource: Fabric.com
Yardage: 1 yard
Pattern: Made By Rae, Geranium Dress

Bronte Top by Jennifer Lauren Vintage: “Sangria”

Crafty Little Secret - Bronte Top craftylittlesecret.comAs evidence of just how much I love this pattern, when I was working on this post I created a folder called “Bronte Tops” and put this one in the sub-folder “Sangria”. I’m just so sure that I’ll be making more of them!

Bronte is the newest pattern from Jennifer Lauren Vintage and she is the most flattering t-shirt EVER!!!!!! While I sewed up this Sangria Bronte within, like, 2.4 milliseconds after the pattern’s release, Jennifer is currently hosting a Bronte Sew Along with tons of tips for sewing with knits. So if you haven’t bought the pattern yet, here’s your excuse! (Jennifer is not paying me to say this and, in fact, has no idea who I am. I am just a girl who sewed this pattern and loves it.)

Crafty Little Secret - "Sangria" Bronte topJennifer suggests using a medium weight knit with good recovery and about 40% stretch for this pattern (a detailed description of how to choose your fabric is included in the pattern). It was perfect for some beautifully intense knit fabric my mom gave me for Christmas (along with the blue fabric I used on my Blue Afternoon skirt). With a beautiful color like this, I decided to name the top “Sangria”!

Crafty Little Secret - "Sangria" Bronte Top craftylittlesecret.comAs is often the case, I forgot to transfer the pattern markings on half my top so I was guessing a bit with the shoulder construction. As you can see, it just doesn’t quite sit flat at my shoulders. You can see the pulling a bit where the front panel is sewn to the back (arrows).

Crafty Little Secret - "Sangria" Bronte Top craftylittlesecret.comI opted to use some emerald knit left over from my Eva dress to add a little pop to the neckline and couldn’t resist sewing on a few little button details too. I knew I was saving those mini scraps for something!

Crafty Little Secret - "Sangria" Bronte TopOne of the things I love most about this top is the shape it gives me. I’ve got the bust handled, but from waist to hips I’m pretty much just a tube. The shape of this top is really very flattering from the back (even more so when I remember to adjust myself and smooth the wrinkles before taking photos!

Jennifer gives the option of using a twin needle to finish the hems and neckbands, which I took because I can’t resist the opportunity to use a twin needle. I found that my hem stuck out a little too far (I ended up taking 2″ out of the side seams at the bottom of the top) and the hems on my sleeves stick out in a bell shape a wee bit too. I’m not sure if this is due to using a heavy fabric or perhaps I am stretching my fabric as I sew? Maybe Jennifer will include tips about dealing with these hems during her Sew Along.

Crafty Little Secret - "Sangria" Bronte Top craftylittlesecret.coAnother final note on this pattern. I’m 5’10”, a little long in the body and I like my tops to hit mid-fly on my jeans. I added 2″ to the length of this pattern and it is pretty perfect.

Also, you’ve only got two more days to enter my Vintage Sewing Pattern giveaway celebrating my 100th blog post. Contest closes Wednesday June 25 at midnight (PST) and the winner will be announced Thursday June 26.

Now to go back to searching for the perfect print for my next Bronte top…..

Pattern: Bronte top by Jennifer Lauren Vintage

Total Time: Including cutting and modifications, about 4 hours
Fabric:
– 1.3 yards medium weight knit
– scraps from Eva dress for neckband
Size: 20
Modifications: 
– added 2″ to length
– took in waist by 1″ and hips by 2″