Monthly Archives: February 2014

Ele-Fun Refashion (And Blue February Sew Along)!

So I have this skirt that I never wear but won’t throw away because the fabric is just so cute!

Before Refashion Skirt

Look how happy I am to be wearing my skirt!

It’s comfy and a nice length but really, really hard to find tops to pair with it. I have both mustard yellow and navy tights that look quite adorable with it but have never been able to find the right top. And so it sits, languishing in my wardrobe, tiny little elephant eyes forlornly begging to see the light….

ModCloth EleFun in the Sun Dress printWell little elephants, your day has come because I have decided to kill two birds with one stone; make a refashion, and participate in my first ever sew along! This month is Blue February which was the final push I needed to actually get started on this project!

Truth be told though, this skirt is actually already a refashion of a dress I bought a couple years ago that was just nowhere near fitting around my bust. But those darn elephants implored “You can find something to make with us!”. Here’s the original dress from ModCloth;

ModCloth EleFun in the Sun Dress

Truth be told I think the original dress was the cutest variation. Sigh…..if only it had fit!

So I guess this is really a refashion of a refashion!

Anyhoo, I started by ripping out the zipper I had carefully sewn into the skirt and removing the waistband (which I saved to use as bias tape later!).

Stitch RippingI figured that if I made the skirt into a top it would be way easier to wear because it would look great with a pair of jeans. Easy peasy!

The first time I refashioned the dress into the skirt do you think I saved any of that extra fabric? Nope! So I only had what was in the skirt and unfortunately, it wasn’t enough to cover my shoulders and my tummy at the same time (something I consider a minimum criteria for shirts these days). I went out and bought myself a half yard of navy chiffon for $3 to create a sheer detail across the shoulders of the top I was making.

I used the yoke from a pattern with a nice neckline (my favorite Mathilde blouse), altered it (somewhat successfully) to include sleeves, and used that to make the front and back sheer portion of my new top.

Refashion arm detail

Remember that waistband I saved? I used it to make bias tape to add a fun sleeve detail. Well actually, it wasn’t cut on the bias but it was folded and attached like bias tape. So what is it? Just tape? Hem tape? Oh the things I have to learn…

Refashion arm detail
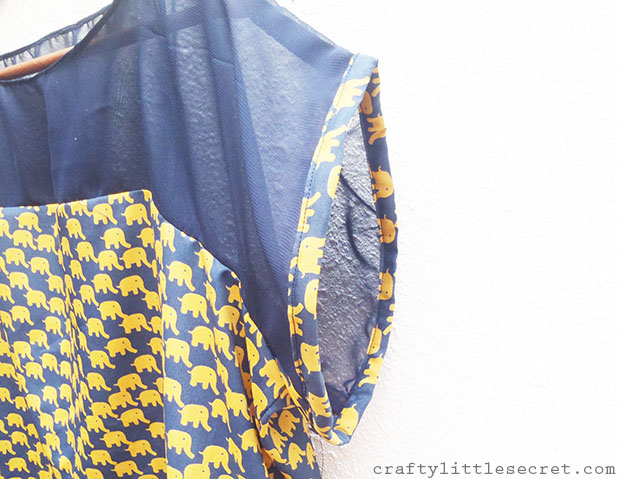
This was my first time working with chiffon and boy oh boy does it fray, so there is a rolled hem under the bias tape to try to keep everything together. Likewise, all the seams are French seams. This also helps keep things looking pretty since the top is sheer. You can sorta see the French shoulder seem in the photo above and here is a picture of the armpit and back seams.

French seamsI toyed with the idea of putting the elephant trim around the neckline too but thought it would be too much. So instead I tried another first – my first rolled hem! Or rather, I watched YouTube videos about how to make a rolled hem and realized I would need to buy a special foot for my machine so then I just kinda did my own thing. But it turned out pretty well and hopefully if I wash it really carefully the fraying will keep to a minimum.

Rolled hem detailI’m pretty proud of myself for all the first with this shirt;
– first Sew Along
– first refashion
– first time sewing chiffon
– first (sorta) rolled hem

Elephant shirt refashionIf you exclude the price of the original dress (which I do because I spent that money like three years ago), I spent a grand total of $3 and a couple of hours to have this completely adorable and completely wearable new shirt. Totally worth it in my book!

Before and after


Crafterall Papercut Map Art

My brother and sister-in-law gave my husband and I some beautiful artwork for our wedding and we’ve finally got it up on the wall so I thought I’d share it here.

Crafterall map artThese beautiful layered papercut maps are from the Crafterall Etsy shop and my family knew that I had been drooling over them for quite some time. Imagine my delight when we got a set of our very own!

The map on the left is the San Francisco Bay Area, where we met and currently live, and the map on the right shows the San Juan Islands off the coast off Washington, where we got married (we had the ceremony on Jones Island).

Map Art San Juan IslandsWe briefly toyed with the idea of hanging this art in our living/dining room to have it out where people can see it, but look how perfectly it goes with the origami swallow mobile I put up in our bedroom! How could we possibly hang it anywhere else??

Crafterall San Francisco map

Also pictured here are the adorable anchor pillow shams a friend gave us for Christmas

Now all I have to do is figure out what to do with the vast expanse of white space above our bed! Living in earthquake territory, we’re nervous about hanging anything heavy or framed in glass. I’ve suggested a big beautiful tapestry but my husband is lukewarm on that idea. I’ve been wanting to make us a big Japanese shibori-inspired quilt in shades of white and indigo, maybe if I ever actually get around to doing that we can hang it on that wall…

You should check out Crafterall, there are tons of other beautiful maps available in all different colors (I love the map of the Great Lakes too)! You can get custom work done too but, according to a bulletin on her shop, she’s got custom work keeping her busy through June of this year! Way to go!


Ben’s Birthday Sweater!

My adorable little nephew had his first birthday this weekend and while I didn’t get his present mailed in time, I at least finished it in time for his birthday!

Paton's Hooded Cardigan knitting patternI really wanted to make him a little hoodie so I chose the free Paton’s Hooded Cardigan pattern in size 12-18 mo. (fingers crossed that it fits him!). Clearly, however,  this sweater does not have a hood. I ran out of yarn.

Paton's Hooded Cardigan knitting pattern size 12-18 moI was commissioned to make a sweater for my nephew by a friend of my brother’s who brought some amazing lamb’s wool back from Australia, so I only had a finite amount of yarn. It was hard to guess how much I’d need since I was altering the suggested color blocking and I think I made the arms too long. Oh well, it’s still pretty darn cute without the hood too.

Paton's Hooded Cardigan no hoodI carried the stripe along the chest and back but didn’t include it in the sleeves. I’d never knit this pattern before (and this is only my second sweater) so I wasn’t totally sure about the construction and how it would all come together. I figured if I did the stripe on the sleeves and it didn’t match up it would make the whole sweater look wonky so it was better to just leave it off.

Baby cardigan knitting patternI used Moda Vera Pure Wool 8 ply, the blue is colorway 47 and the teal is colorway 37. Do you think I would keep track of how much yarn I actually did use in case someone wanted to replicate this? No, of course not. I definitely don’t knit as much as I sew so remembering what details I should be tracking is a bit of a learning experience for me.

The collar was relatively easy to add, which was nice because I’d never made an alteration like that to a knitting pattern before (wipes brow with sigh of relief). I just followed the pattern and cast off the neckline as detailed in the pattern. Instead of adding a hood though, I counted the number of stitches around the neckline (I think I had 62), then I made a K1, P1 [repeat] rib that was 6 rows long and sewed it on.Paton's Hooded Cardigan baby knitting patternIn addition to the collar alteration, another first for me with this project was blocking! I wrapped a bulletin board in a towel to use as my base then spritzed the sweater with a bit of cool water and pinned it in place on the board. I probably should have blocked each piece individually before assembling the sweater, but I didn’t think of it then. So instead I blocked in two stages; the body of the sweater first, then the arms in a second step. The blocking definitely helped keep the collar from folding over and corrected some wonkiness along the button placket.

[ASIDE: All this knitting talk reminds me – you can find me on Ravelry as CraftyLilSecret].

Happy birthday Ben! Sorry your present is late, but something tells me you won’t hold it against me…..

Tutorial: DIY Baked Clay “Person Planter”!

Sculpey Clay People PlanterIt’s a much needed rainy day today in San Francisco and it gave me a hankerin’ for a rainy day craft. I’ve propagating some of my succulents and am in need of somewhere to put them so I’ve been imagining all varieties of little clay pots that I could make with the clay leftover from my garden markers. Of course, when I finally decided on a design I also decided it would be absolutely perfect for a little flowering cactus I have that didn’t need a pot!

Cactus FlowerOh well, no worries. I’ll just make some mini pots for my propagated succulents later…

The design for this adorable little person planter is based off one that I saw on Etsy but I didn’t pin it straight away or favorite the shop, and try as I might I can’t find it again! Sorry!

So instead, here is a little tutorial on how I put mine together.

For materials, all you need is an adorable little cactus or succulent in a plastic pot, some Sculpey clay (or other baking clay brand) and a butter knife you don’t mind mucking up a bit.

My cactus was bound in the soil well enough that I was able to gently tug on it and pull the soil out of the pot without making too much mess.

cactus red flowerThen I could use the pot to cut a circle out of some clay that I had rolled to about 1/8″ thickness.

DIY Sculpey clay person planterIt takes a little working the clay in your hands to get it soft enough to roll out. I found it easiest to work little 1-2″ balls of clay at a time then amalgamate them when I’d warmed each up.

DIY backed clay person planterThis circle that you’ve cut out will form the base of your pot and the surrounded ring can be combined back with the rest of your clay.

I next rolled out a ball of Sculpy that was….oh….I’d say a little smaller than a tennis ball, to a 1/8-1/4″ thickness. You really can’t go thinner than that or the clay won’t have enough strength to hold it’s shape. Even at the thickness I used, it was pretty delicate and warped a little with the cooking (but the plastic pot still fit in easily at the end).

Roll this piece out to be a long oval shape because it will be trimmed down to a rectangle to form the sides of your pot.

DIY backed clay person planterOf course you could easily figure out the circumference of your circle, and thus the length of rectangle needed, with a little math. But who wants to do math??? Instead, you can make a little tick mark on the mouth of your pot. Lay the pot on the clay and gently roll it around until you reach the tick again, marking your start and end points. The distance between the points should be the length of rectangle you need!

I wrapped the rectangle around the base of the pot, gently rubbing the seam where they join together being careful not to distort the shape or thin the clay.

DIY backed clay person planterNow you should have a cup shape. I had some ragged looking edges on the upper rim of the pot that I wanted to smooth out.

Smoothing Sculpey clay

Can you see? The left side has been smoothed and the right side is the original rough edge. Also, you can see the potting soil that I kept rolling into my clay because I didn’t clean my work surface well enough!

To smooth these edges out just gently rub your finger along the rim with very little pressure. Run your finger over the edge a few times and the heat from your finger should smooth out the edge. Use this technique to cover up the seam where the two short edges of the rectangle joined. Again, be careful to not push too hard and distort the shape or thin the clay.

Next, I rolled out a couple little logs of clay and cut them to size to form the arms of the person planter.

DIY backed clay people planterBaked clay plant pot tutorialGently press the arms onto the sides of the pot, supporting the back as you do so. I really rubbed the shoulders and made sure that they were well attached to the pot.

DIY Sculpey clay plant potAs you can see in the picture above, that distorted the upper rim of the planter a bit so, again, I just gently rubbed it with my finger to smooth it out.

I used the same technique to make a pair of legs that I attached to the pot and even added some cute little feet at the end. I very carefully transferred the whole thing to a Pyrex baking dish and put it in the oven for 20 minutes. The Sculpey clay packaging suggested 15 minutes in a 275 F oven per 1/4″ thickness, but you should definitely check the directions for your clay before proceeding. The Sculpey packaging also warned not to microwave or over bake the clay. I have no idea what dire consequences you’d experience if you attempted either of these things.

Sculpey clay person planterOnce the clay cooled, I plopped my cactus in and I think the end result is pretty darn cute! As I mentioned previously, I did get a little warpage as my clay heated but the baked clay products don’t dry rock hard like kiln-fired clay and my cactus was in a thin plastic pot so I was still able to fit the cactus in no problemo!

DIY Clay person planterAnd there you have it, a DIY baked clay “Person Planter”!