Author Archives: missphd

Decisions, decisions….

I haven’t been knitting much lately and I’ve been itching to get back into it, but haven’t had the inspiration. Before Christmas I was working on a second sweater for my much anticipated niece/nephew but about halfway through the project I realized it was going to be waaaaaaaaaaay too big for the kid and it has sat untouched since. Maybe I’ll get inspired to take it apart and restart it. Maybe.

Then I started thinking that I’d like to knit something for myself again. Scarf? Cowl? Boring. I knit my mom a really nice beret for Christmas last year and might make one for myself but that’s still not that exciting. I need a big meaty project. And then I thought to myself, what about a sweater?! And then I remembered that I’m halfway through making myself a sweater (I had so thoroughly forgotten about it that it’s not even listed in my “On the Go” post…). But once I finished the back and thought it might end up too big I just kinda gave up on that one too. I WILL finish it though, mark my words.

I thought about it though and don’t really feel like making a sweater. I’ve got lots of ’em. Then it struck me. A sweater dress!!!! As I trolled Ravelry for the perfect pattern it occurred to me that I didn’t want to pick something knit on the world’s lightest weight yarn this time (something I’m prone to doing) and that this might be the perfect project to delve into the world of chunky weight yarn!

Here are some of the patterns I came across that I’m thinking of.

The Diva Tunic

This one is the Diva Tunic. Cute (without the silly sleeves), and a length I’d like but knit on way too small a needle for such a big project I think.

Roam Tunic

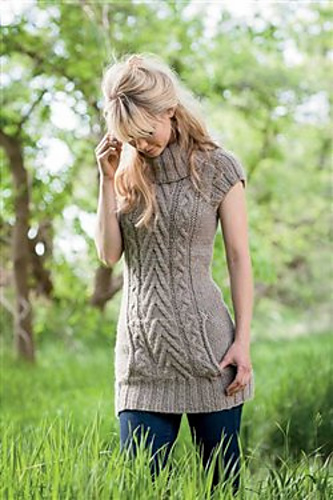
The Roam Tunic has the same problem as the last, with being knit on smaller needles, plus I’m not sure that I like the neckline. It is too much of a classic turtle neck and I prefer a larger cowl if I’m going to do something like that.

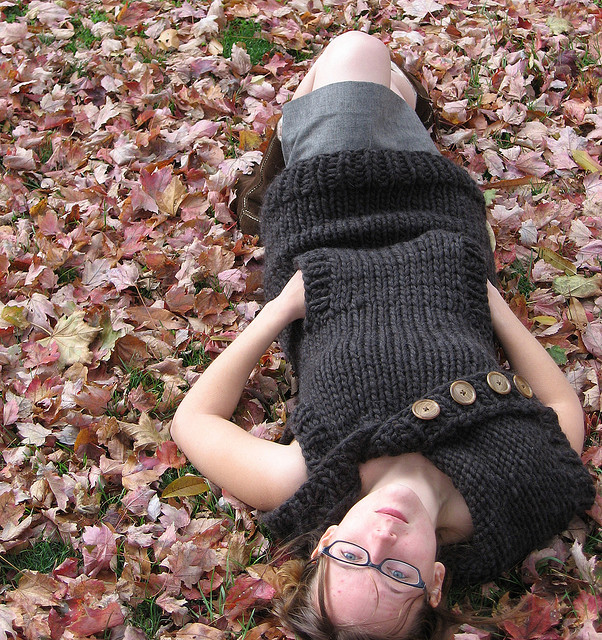
The last two options are both from the same knit designer and I’m a little nervous to try either one. The Kangaroo Tunic is cute, but might end up being too bulky with the big pocket in front and large kneck. I’m also not sure why the girl is upside down in the post.

Kangaroo Tunic
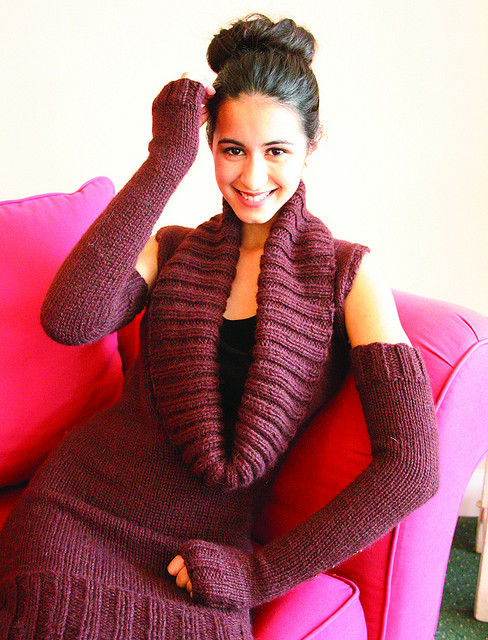
The one I’m leaning toward the most is the Shopping Tunic. It’s simple, stylish and cute and looks like it wouldn’t be too difficult to increase the length and make it a cute little dress to go with some leggings. Or maybe I just think it looks cute on the skinny girl in the picture.

Shopping Tunic

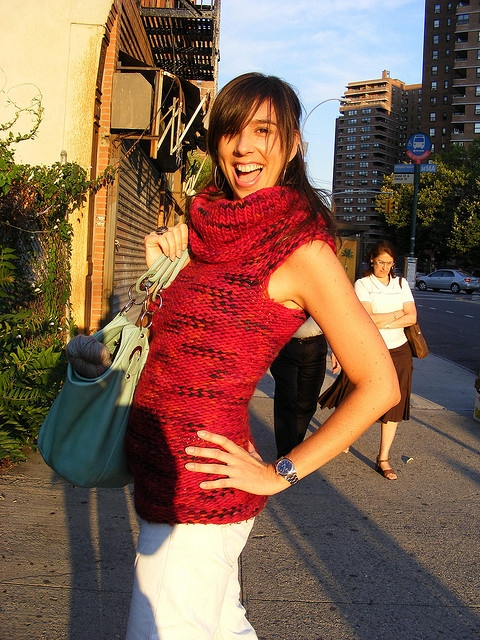
The other thing I’m a little bit worried about, speaking of skinny people, is the comments on Ravelry about this entire book, Twinkle’s Big City Knits. In general it sounds like these patterns are sized very small and contain a lot of errors. For instance, according to the book this pattern requires 10 skeins of yarn (7 in the addendum), but all the knitters have said it only takes 3-4 skeins. I guess I figure the upside of this one is that, on size 16 needles, it would knit so quickly that if it didn’t work out it’s not like I would have wasted much time and I can just use the yarn for something else.

Anyone have experience with altering the sizing on sweaters??????


Holiday Project Roundup!

It was touch-and-go for a while there, but I actually managed to finish all my holiday projects in time for Christmas! The main focus of my attention this year was my niece/nephew, scheduled for arrival in early February. The lucky little guy or gal will the be recipient of the first sweater I’ve ever completed! Turns out they’re much easier to finish when they’re miniature…

SAMSUNG

I’m so proud of how it turned out! I used the Debbie Bliss Baby Reefer Jacket pattern with a couple changes. I thought it would be easier for both me and the parents to forgo actually button closures on the front in favor of decorative buttons sewn to the front with hidden snap closures on the underside.

Also, I’m not big on counting rows when I knit. I kinda just knit until it looks “long enough”. This cause a problem for me when it came time to add the ribbing that forms the double breasted front of the sweater. The pattern called for me to cast on “x” number of stitches to start the ribbing, but I hadn’t followed the instructions for the length of the stockinette portion. Instead, I just picked up the stitches and knit the ribbing right onto the sweater. This resulted in a slightly different neckline on the sweater, but I think it’s still pretty cute!

Expert knitters may also want to avert their eyes from the mess that is the underarm seam. The seams up the side of the sweater turned out really well but it got awkward once I had to start stitching the arms. It looked like I should do Kitchener stitch, but I only know how to do that off needles (a nice video tutorial, here). So I just sewed it.

I also sewed up a few of my signature hand sewn felt aplique onesies, keep your eyes out for a tutorial soon (sorry for the poor quality of the images, I took them on my phone)!

SAMSUNGFinally, I wanted to make a little something for my boyfriend’s family for Christmas this year so I made some spiced candied nuts and knit up a couple Christmas birdie ornaments.

I’m not sure where the nut recipe is from originally, but it’s similar to this one from Martha Stewart. I just left out the egg, allspice and chili powder. Instead of baking them, I tossed them around in a pan with the sugar stirring constantly until they browned (about 15 min), then tossed them with the salt, spices and an extra tablespoon of sugar. Warning, these are like crack.

chicken

The birdie ornament is a free pattern download from Ravelry that I posted about earlier. I made two versions of this ornament, one following the pattern and one chicken instead of robin. I actually think the chicken turned out much cuter (and easier, as it didn’t involve any color change)! For the comb I just crocheted a single chain about an inch and a half long then stitched it on scrunched up like an inch worm. Easy peasy!

Holiday gift ideas for the crafty nerd in your life…

I love trying to make as many gifts as possible for the holidays. It’s easy on the budget and I think people really do appreciate a handmade gift. In my endless search for inspiration I’m always coming across things that I would love to have made for me, but that not many people on my gift list would appreciate.

So. If you’ve got a crafty nerd in your life, here are some handmade ideas that might light up their holidays!

Laura Splan is an artist who “explores perceptions of beauty and horror, comfort and discomfort”. Many of her pieces include representations of parts of the human body, microbes and illness, including these viral doilies that I love – perfect for that special virologist in your life!

Laura Splan

The doilies are pretty intense and are computerized machine embroidered. Maybe you’d like something you could make yourself for your favorite virologist? Try this bacteriophage crochet pattern available on Ravelry for $5!

bacteriophage

Since I’m a virologist myself, you’ll sense a strong microbiology theme to these handmade gift ideas….but it’s the prettiest science, anyway! Just look at these stained glass microbes for proof (available from the trilobiteglassworks etsy shop)!

glass microbe copy

It’s always nice to try to give the gift that keeps on giving, and nothing does that more than microbes! Especially this set of 12 cross-stitched microbes of the month, available in aliciawatkin‘s Etsy shop.

microbe month

This pillow would be perfect to help your favorite molecular biologist to spend this holiday season asleep in their bed while visions of mitochondria dance in their heads.

cell pillow

Better get these gifts while they’re still available though, microbiology and nerd crafting is taking off! Etsy seller CleanerScience seems to be all out of their petri dish soaps!

petri dish soap

Or maybe the lab rat in your life would love this knitted dissection! Amazing!!

mouse dissection

All this gift making can make a nerd hungry! Don’t forget to nourish your cells with these science-themed cookies. I love the electrophoresis squares, find out how to make your own with a great tutorial on Not So Humble Pie (these chocolate atoms are pretty cute too)!! In fact, just go here and check out all her amazing science-themed baked goods! You can get your own Labcutter cookie cutter set over at ThinkGeek.com

cookies

Special thanks to Birdie for helping me compile this list! NERD!!!!

Knit’s beginning to look a lot like Christmas!

Get it? “Knit’s”. Instead of “It’s”. Oh ho ho! That clever pun is meant to inform you that this is a knitting post! Yay!

While trying to organize a December Crafternoon with my crafty friends, I started pondering what crafty Christmas things I could do and started thinking about ornaments.  My go-to site for inspiration is, of course, Ravelry, so I searched around to find some quick and easy knitted ornament patterns.

To save you from going to the same trouble, here is my Christmas ornament Ravelry roundup! (All the patterns shown below are FREE to members of Ravelry!)

Of course, if one is decorating a tree, the only place to begin is with the lights! And there’s some adorable ones, like these, that you could make yourself! Pfft. Buying lights is so two thousand and late.

I started by looking up some good ol’ fashioned Christmas balls. Because who doesn’t like balls?? I thought these ornaments looked cute (and this one too) and since no one is going to wear them it won’t matter if my yarn isn’t carried over properly behind the entarsia….unlike the hat I made my brother last year for Christmas….

ball1 copy

I found tons of other cute knitted creatures that would make adorable ornaments too! Like these robins, acorns, and this reindeer (I assume his name is Rex because Rudolph is copywrited???).

reindeer copy

But ended up in some sort of weird drooling cuteness coma when I came across this owl, and these sheep. Whaaaaaaaaaaat? Too adorbs.

owl copy

If you want to expand your decorations beyond the tree and into the rest of the house, what about this dear deer head or this amazing knit nativity scene!

deer

nativity

Now all that’s left is for me to actually get around to making one or two of these. If I ever do, I’ll be sure to post them!!!

How To: Zombie Make-Up (WARNING: Totally gross pictures)

A few years ago a lifelong dream of mine was fulfilled……I participated in a zombie walk!!! A very generous friend walked with me and we decided to be….wait for it…..zombie rights activists! Yeah, it was as great as you’re imagining. And to prove it, check out this picture.

My t-shirt said “Zombies just want hugs” and the other side of the sign read “Brains not bombs”.  CAUTION: If you have a sign that reads “Brains not bombs” REAL weird hippie “Food not bombs” activists might talk to you A LOT, mistaking your cleverness for shared interests. On a funny side note, a friend who didn’t participate but watched from across the street eavesdropped on an amusing conversation.

Passerby #1 (watching the zombies walk by): What’s going on?!?!
Passerby #2 (as I walk by): I dunno, protesting somethin’.

Anyway, I got TONS of compliments on my makeup that day from fellow zombie enthusiasts and also, to my shame/delight, scared the shit out of passers by and had numerous people stop to ask if I was ok. So, I thought I’d share my makeup tips. Unfortunately, I didn’t take any pictures of the process so I’ll have to use my vivid prose to paint the picture for you.

1. The base coat. Many people buy the white make up from the drug store and smear it in a thick coat all over their face when trying to look like a zombie. This is their first mistake. It looks way too fake! I didn’t actually use any “costume” make up for my look, I just used what was already in my make up bag. For my base coat I used that green cover up that is meant to correct red spots, but I’m sure a really pale concealer would work just as well.

2. The dark circles.The second mistake people make is taking that same cheap costume make up kit, and smearing black in big circles around their eyes. I just took my black and brown eye shadow kits. I worked the colors into the inner corners of my eyes, extending onto the lids and below the eyes. A nice “rotting” touch is to add the same kind of make up below your nostrils, the outer corners of your eyes and to the corners of your mouth.

3. Looking gaunt. Next, you need to imagine everywhere your skin would stretch over your bones if you were a rotting corpse. Take the brown/black make up and use it to define your cheek bones, your neck, your temples and your collar bones. This pre-blood picture shows some of the areas that I worked on.

4. The little things. My friend had the fantastic idea to rim our eyes with red lip liner. I can’t stress how much difference this made to our overall look! I also used green eyeliner to draw some veins at my temples, though I think they’d worn off by the time this photo was taken.

5. The “bits”. Let’s face it. Zombies are gross. They walk around with food hanging out of their mouths (as you can see in the pic above) and bits of skin falling off their faces. This is the part of the make up that I got all the compliments on. My secret? I made my own gore instead of relying on the fake-looking store bought ones. I bought liquid latex from the local craft store then painted it, in very thin layers, onto waxed paper. I let each layer dry then added another, for a total of 3 or 4 layers. By keeping the latex thin, it is easier to blend into your skin when you’re trying to apply the wound. Then I carefully peeled the latex off the waxed paper and kinda just went with it. As it peels off the paper, the latex is really sticky and will stick to itself a bit and make some strange shapes. For instance, I ended up with this really cool piece that looked like a torn off earlobe.

I also wanted to try to make some gore that looked like my jugular had been exposed. I took a bit of tubing from the lab and inserted it into a piece of latex that I’d made. When each bit was to my liking, I painted it up with normal latex craft paints and left them to dry. I found it hard to cover the latex with make up and have it look convincingly like skin, so I painted to the edge of the latex. I attached them by applying a bit of the liquid latex to my skin and a bit to the gore. Here’s a good view of my neck gore.

6. The blood. And now, my friends, you’re ready for the blood. After reading much ridiculousness online about fake blood recipes containing ketchup or tomato sauce, I tested a bunch and settled on the oldie but goodie; corn starch and red food coloring. I don’t remember the exact ratio but just play with it until you get a consistency you like. Damn, that stuff is sticky though.

So that’s it. Go forth and eat brains!


Costumes of Halloween Past

In the countdown to this year’s Halloween I thought I’d post a Greatest Hits collection of my past homemade Halloween costumes.

2005: Little Dead Riding Hood

A couple of us had the idea to go as Twisted Fairy Tale characters so I made myself a Little Dead Riding Hood costume and sewed a Drugged Out Alice costume for my friend.

Little Dead Riding Hood and Alice

I had a friend make the scars for me out of latex and he did a fantastic job! In my “goodie basket” I had some eye balls and intestines that I made out of paper mache and painted up. The outfit was pretty basic and simple to put together. I used McCall’s Misses Costume pattern 2890 and if I recall correctly, the only difficult part was the corset.

2006: She-Ra!

She-Ra: Princess of Power!

I recycled the cape from the Little Dead Riding Hood costume but hid the hood and wrapped the ribbon closure under my arms (since She-Ra’s cape just kinda sticks out of her back magically). I just sorta made up the skirt pattern and used a dress with a sweetheart neckline to pattern the top. For the boots, I sewed the boot uppers and then just hot glued them to an old pair of high heels (they were not a good choice for freezing cold rain and did not hold up well). The head piece was just straight up papier mache but the breast plate was made using Plaster of Paris strips, something like this. I was pretty proud of that breast plate. I wrapped my body in Saran Wrap and layered on the Plaster of Paris strips, then realized I couldn’t sit down or I’d muck up the bottom of the breast plate. So I just stood there in my apartment waiting for it to dry, covered in Saran Wrap and plaster. Luckily it only took about 30 min. Once I had the base layer done I was able to work with it off my body and I used thick card stock to make the raised details.

2007: Bjork!

Bjork!!!

This was based off Bjork’s infamous swan dress that she wore to the Oscars in 2001. My Halloween costume this year was pretty fantastic, but I dunno. This Bjork costume will always hold a special place in my heart and might be my favorite. I bought a nude colored generic undershirt and used that as my base for the dress. I sewed a basic white circle skirt to the bottom of it. The swan head and neck was just a tube sewn out of felt that I hand glued feathers all over. I layered 8 meters (!) of tulle, gathering and pleating it as I went, for the skirt. As the tulle came up the bodice, I incorporated some feathers into it too. The skirt didn’t come out as full as I would have liked but I ran out of time and fabric. I can’t even imagine how many meters were used for Bjork’s dress! This costume has held up really well, I’ve worn it for costume parties since and it traveled with me across the continent from Halifax to SF!

2008: Mel from Flight of the Conchords

“Mel” from Flight of the Conchords

2008 wasn’t my best year as far as Halloween was concerned. I was trying to write up a paper and finish lab work so I could start writing my thesis and I just didn’t have the time to devote to a proper costume. I still think this one turned out pretty cute though. Mel is the creepy stalker fan on Flight of the Conchords played by Kristen Schaal and it’s hard to look like her! I made a t-shirt and some buttons, made creepy faces when I posed with the boys and put a little extra curl in my hair. Here’s a picture of Mel to show the look I was shooting for.

The most embarrassing part was that no one knew I was in costume when we got to the bar. LOL!

2009: Rock Lobster

Rock Lobster!

I’d been thinking about the Rock Lobster costume for a couple years but I always ended up picking another costume. But for Halloween 2009, I had just defended my PhD and suddenly felt like all the time in the world. Enough time, in fact, that I also made my friend an Astro Boy costume!

The Rock Lobster was surprisingly easy. I made the AC/DC t-shirt with one of those printable t-shirt transfers. The claws and legs were just made with cheap felt and stuffed with poly fill. I was happy I thought about the fact that I wouldn’t be able to hold a beer with those claws on so I sewed little mitten covers to the bottom so I could hold onto things. The antennae was just made out of red foam and styrofoam balls glued to a headband.

The Astro Boy costume was pretty easy too. The boots were borrowed from a friend and the shorts he already owned. I went out and bought a (women’s) nude colored undershirt and transferred an image from the movie poster onto it. I embellished it a bit with some wires, etc too. I put a piece of skin-colored felt over it and sewed it on like a door with a little piece of velcro to stick it down. Since this was in Halifax and Halloween can be damn cold there, I used that nude colored figure skating costume spandex to sew some leggings for him too.

2011: Bay Area Breakers Roller Derby Girls

Bay Area Breakers!

I don’t remember how or why we decided to be roller derby girls. I think we just wanted to have fun names like “Carnage San Diego” and “Clank the Tank”. Whatever the reason, the costume came together surprisingly well. We bought the hot pink spandex you can see on our shirt and made bootie shorts (I just traced a pair of underwear to make a pattern). To make the shirts we painstakingly cut out the words with an exacto knife and then fabric glued them to the t-shirts and outlined with silver fabric paint. The kilt was the world’s easiest pattern. I’m going to put up a post soon that describes how to make a couple easy skirt patterns. I was particularly proud of the “roller skates”. I sewed little wheels out of the same pink spandex then just stapled them to a pair of boots!

2012: Max and a Wild Thing!!

You’ll have to tune in on Halloween for the big reveal/tutorial on this costume!!

Off the List!

Well, I’ve got one item crossed off my crafting to-do list. I finally sewed the pocket onto Pete’s hoodie! As per usual, I forgot to take pictures throughout, so I don’t have a tutorial. Here’s the Nike hoodie that inspired his makeover;

Pete thought it would be handy to have a zipped pocket on his sleeve for his phone, cards, etc. I think the pocket I sewed ended up being a bit bigger, but it fits a phone nicely. I’m just pleased we were able to match the fabric so well!! Here’s a close-up of the finished product, I’ll update this post later with a pic of him wearing it if I remember to take one.

We chose the white zipper to match the existing zipper up the front of the hoodie. I figured it’d be easiest to just put a seam up the middle of the pocket and sewed the zipper into that. I also hemmed the edges of the pocket before I sewed it to the sweatshirt (rather than pinning the edges down then sewing them in place). Having the visible stitches made it way easier to sew on, allowing me to avoid any hand stitching. When I sewed the pocket to the sleeve, I just sewed in the groove of the existing stitches – gave a nice line to follow to keep things straight. Now all it needs (apparently) is a Trailblazers patch sewn to the chest!

On the Go…

Life’s been kinda hectic lately and haven’t had much time to craft or post! (You may have noticed the lack of a Pinterest Peeve of the Week last week). Anyhoo, I thought I’d take a moment to give you a sneak peak of what I’m working on and what’s coming up for blog posts and tutorials! It’s funny, I had no idea I had so many projects on the go until I started counting them up for this post. Guess I’d better get busy….

1. Pete’s Hoodie.
My boyfriend requested an upgrade to his favorite hoodie, so we’ve bought all the stuff and I’m supposed to be sewing a iphone pocket onto the sleeve. Er, almost done, baby!


2. Sweater for niece/nephew

My brother and sister-in-law are expecting a baby….and I’m making it everything!!! Starting with this sweater (I swear, it will turn into a sweater in the end) out of yarn they bought me last year for Christmas. It’s gorgeous alpaca wool from the farm down the road from them and I can’t wait for them to see this!!


3. T-shirt quilt


I’ve been meaning to make a t-shirt quilt for the longest time and I finally got it started!!! I’m keeping it simple since it’s my first quilt and doing a patchwork pattern. I’ve got the front  all sewn together and bought the batting and backing last weekend. I’m still debating how I’ll quilt it but I’m leaning toward fighting my initial urge to bite off more than I can chew and  just doing ties.


4. Needle felting

Last Christmas I bought my sister-in-law this needle felting kit from Wool Buddy from the Bazaar Bizzare (or maybe it was the Renegade Craft Fair…). I was dying to try the needle felting myself so finally gave in and bought another kit for myself. Somehow though, I just haven’t gotten around to doing it yet!


5. Garbage area

love my apartment, but I’ve hated the mess around the garbage area in our kitchen since I’ve moved in. Pete and I decided to finally do something about it one weekend. We’ve got the basic construction done and one of these days I’ll get around to sanding and painting it. I can’t say that we’re expert carpenters but we definitely made some cool finds that day, the coolest being our local re-build center that recycles old building materials. Way easier and cheaper than starting from scratch!


6. Fix market bag

I found this pattern for a market bag on Ravelry and it looked easy enough. Found some cute $2/skein bright green 100% cotton yarn at Michael’s and thought it would be perfect. All was going well until I decided it would be cute with a hot pink handle. Now it looks like something a 12 year old girl would own. So I’m going to take off the pink handle and re-finish it in all green. I’m still debating whether it might be cute if I lined it with some white or black fabric, but then it would lose its stretchiness…

7. Take in pants
A friend gave me this pair of jeans/jeggings and they’re super cute. Buuuuuut…..they don’t have any belt loops and are just a bit too big in the waist (I have basically no butt/hips what so ever). I’m planning on putting some darts on the top at the back to help hold them up. Shouldn’t be too difficult (famous last words!).

I’ve got a few projects lined up that I haven’t even started yet too! My boyfriend and I are planning on being Max and a Wild Thing for Halloween. We haven’t even started our costumes yet and we’re going to be away for half of October, yikes! At Thanksgiving my mom’s going to give me the yarn, etc to knit my niece/nephew a little hoodie and my brother has already requested some of my hand appliqued onesies (tutorial upcoming). Looks like I’ll be busy through the holidays!

See? I don’t just bitch about Pinterest, I make stuff too!

Lobster Mittens (Free Pattern!)

One of the most complimented clothing items that I own is a prized pair of mittens I picked up at the end of a pier in Halifax, Nova Scotia. These bad boys, featured prominently in the bad ass photo below, occasion comment from strangers nearly every time I wear them.

A few months ago, my boyfriend’s friend was in San Francisco visiting and gushed over the mittens. Having recently taken up knitting again two years ago I said to myself, “Self, now is the time to recreate the lobster mittens”. And here you have it folks, the lobster mittens replica.

I’m pretty pleased with how they came out! And they’re my first intarsia pattern that actually worked! You can find the pattern for the lobster intarsia for free at the end of the blog. I knit this on worsted weight yarn using off-white, red and a wee bit of black (just for the eyes) and I think I was on about a US7 needle.

Now, here’s the place I’d love to be able to write out an amazing tutorial for producing the perfect intarsia. Only problem….I don’t actually know how to do them properly, I just kinda made it up. There are plenty of good tutorials online to help you though. I did come up with a couple tips while doing this one though.

1. It’s way easier to do intarsia neatly if you’re not knitting in the round. I normally do mittens on double-pointed needles but to make these mittens I opened the pattern up then sewed a seam down one side to connect front to back on the mittens at the end.

2. I found it easiest to have three balls of yarn going when knitting the lobster; two balls of the off-white and one of the red. I would knit to the lobster, drop the first off-white and switch to the red. Then I’d knit the lobster section of the pattern, and when I hit the edge, switch to the second ball of off-white. What this did was kept me from having to carry yarn along the back of mitten. Last time I tried to do that, I didn’t keep proper tension and the adorable toque featuring copulating deer that I had made was way too small for the intended recipient with no stretch at all.

Please don’t reproduce this pattern on your website. If you’d like to feature this pattern, please link back to this blog post. Thanks!

Sorry it is not more of a tutorial, but I feel there are many more qualified on the web than I on this particular subject. I’m not sure how to post a link to a downloadable .pdf file for the pattern, so you’ll just have to go off this until I figure it out.

So that’s it folks! Go forth and knit!