Author Archives: missphd

Re-Grow Your Celery and Lettuce!

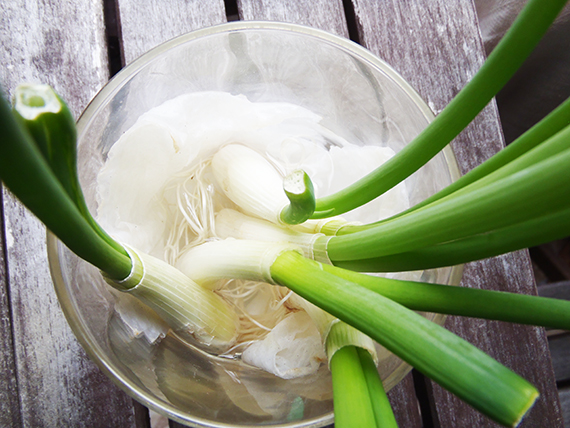
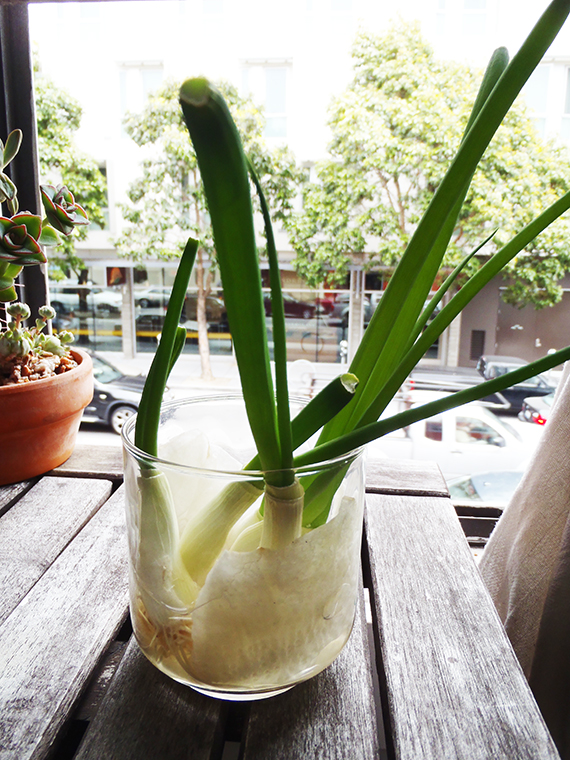
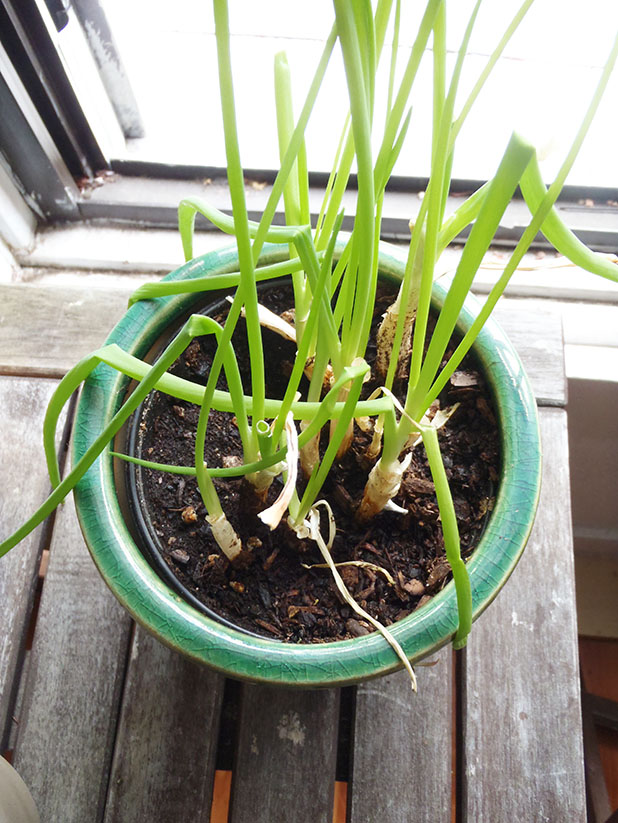
A couple months ago I posted about re-growing your green onions and it worked fantastically! In fact, a week or so after that post I planted them in soil and they’ve been doing great ever since! They’re still re-growing quickly after cutting.

OLYMPUS DIGITAL CAMERAThe green onions worked out so well that I decided to expand into celery and lettuce! Oooooh! Ahhhhhhh!

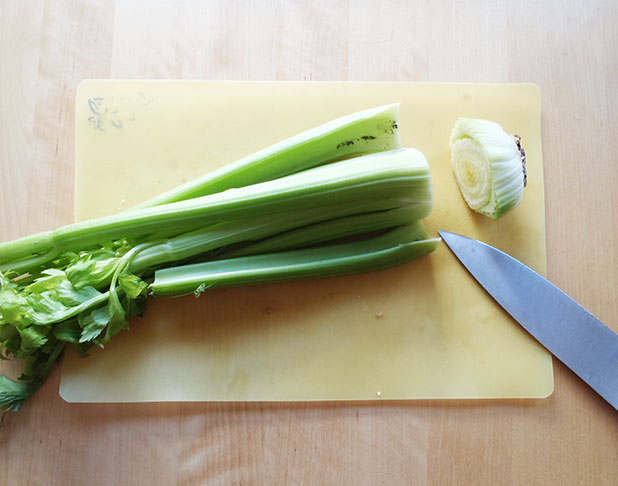
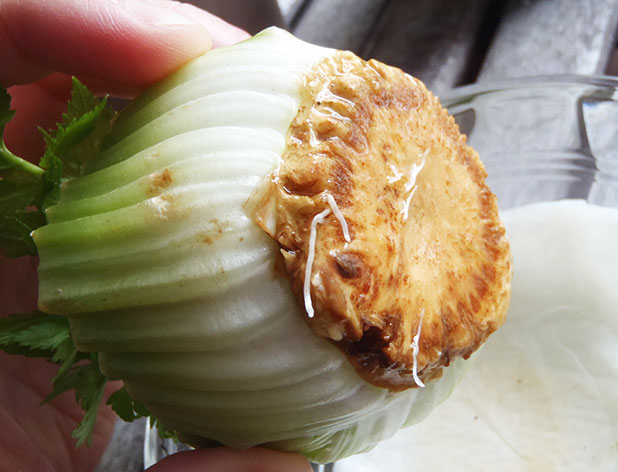
Re-growing these veggies works basically the same way as the green onions. Cut all the stalks off from the bottom stump of celery (or romaine lettuce).

OLYMPUS DIGITAL CAMERA

OLYMPUS DIGITAL CAMERA
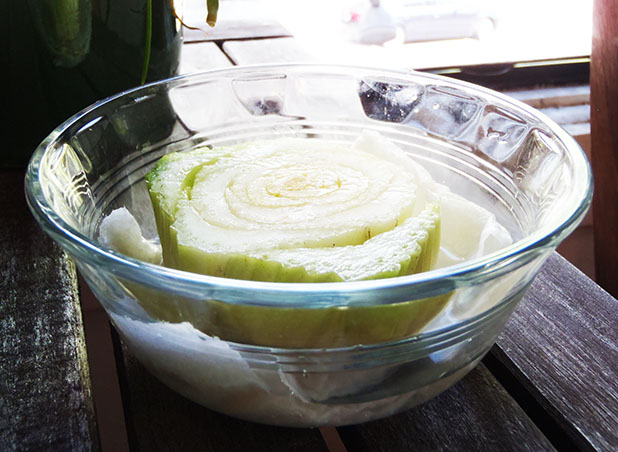
Put the remaining celery nub into a little bowl lined with a paper towel and about a half inch of water. Then wait….

OLYMPUS DIGITAL CAMERA……and wait……

OLYMPUS DIGITAL CAMERA……and wait…..

……and about 3 weeks later, you should finally have a wee little celery plant starting.

OLYMPUS DIGITAL CAMERA

OLYMPUS DIGITAL CAMERA
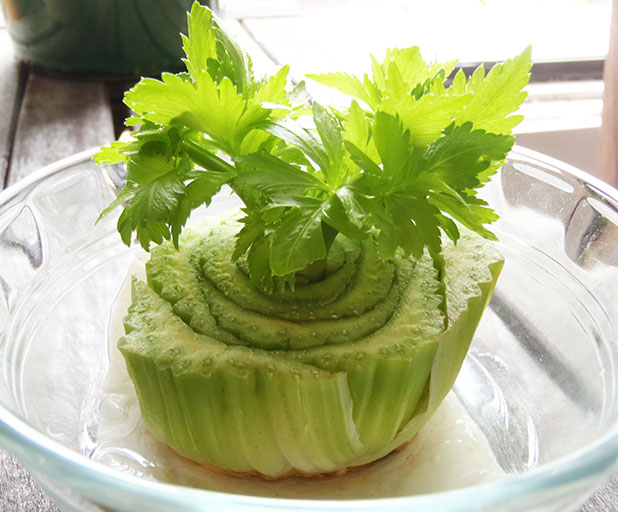
Even after this much time though, the roots have still just barely started to form. So I’m going to wait another couple weeks before I try planting this in soil.

OLYMPUS DIGITAL CAMERA
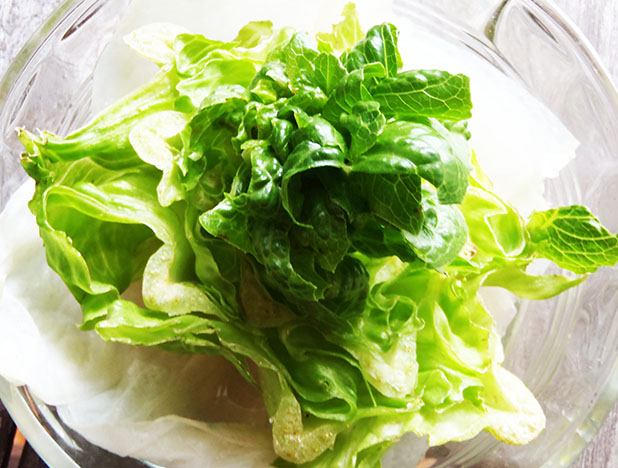
Another vegetable that I’ve found this method works great for is romaine lettuce! And good news, it seems to take a lot less time than the celery. I’ve had this lettuce nub (prepared the same way as the celery nub) growing for about 1.5 weeks, half as much time as the celery. Yet it’s the same size! I think I see the very beginning of some roots forming, but I’ll definitely have to give it more time before I plant.

OLYMPUS DIGITAL CAMERA OLYMPUS DIGITAL CAMERA OLYMPUS DIGITAL CAMERA

The verdict so far on regrowing vegetables from food scraps? Green onions, totally worth it. Celery and Lettuce, mmmmmm probably not so much. But hey, it keeps me entertained while I’m unemployed, LOL!

UPDATE: The lettuce looked great up until about a week ago, at which point it suddenly shot up a huge stalk from the center with a few leaves coming off it. A quick search of the interwebs informed me that this is called “bolting” and seems to be caused by exposing the plant to cold temperatures early on (hmmm…..like beside an open window in San Francisco???) then when the weather heats up, the plant puts up one of these “bolts”. Unfortunately, the interwebs also informed me that when the lettuce bolts it becomes unsalvageably bitter. Bye, bye little lettuce, we hardly knew ye…..

Eva Dress: Pattern from Your Style Rocks

I made a new dress!!

One nice thing about being unemployed for a few months is that I’m finally working my way through my sewing basket and getting to things I’ve been meaning to for a while. Waaaaaaaaaaaay back in May I posted about a little fabric shopping spree I’d gone on, where I purchased a beautiful teal/emerald jersey for a dress with no pattern yet in mind. I settled on the Eva Dress from Your Style Rocks and I am so pleased with how it turned out!

OLYMPUS DIGITAL CAMERAThis was my first time printing a pattern pdf myself (it’s FREE!!!!) and had underestimated how long it would take to cut out and tape together all the pattern pieces. I think it took me as long to do that as it did to put together the entire dress!

I had made the resolution this year that I was going to start trying to sew “properly”. That is, reading patterns fully, following directions properly, ironing seams and using suggested techniques. I was somewhat successful with that on this dress and am proud of how it came together.

OLYMPUS DIGITAL CAMERABecause I used a fabric with stretch, I double-stitched then trimmed every seam in the dress as the pattern instructions suggested. I think it definitely helped to keep things looking neat. I could not, however, bring myself to iron the seams as the pattern instructed and I do think that decision subtly shows in the front waist detail. The ‘swoops’ are not quite as neat as I think they could be and I was left with a tiny bit too much fabric in the waist panel. I briefly contemplated trying to fix it but decided that picking apart the jersey then resewing it was likely to cause more damage than good.

OLYMPUS DIGITAL CAMERAThe pattern was fairly easy to follow. The only place I got a little tripped up was when sewing the facing to the back neckline. I interpreted the instructions as telling me to fold the facing in half, then stitch it to the dress, which I did. Then, the pattern instructed me to understitch and trim to just 1/4″. Lacking any kind of technical training whatsoever with sewing, there are many techniques and terms that I don’t know and “understitching” was one of them. I looked it up on YouTube, did what I thought I should and found that I had this 1/4″ little ragged edged facing bit that stuck up around the whole back of the edge!!! In the end,  I just top-stitched over the whole thing. All that stitching made the back neckline a little heavy, but it turned out not too badly.

I also didn’t really know what the pattern was talking about with respect to the armholes. I opted to just leave them until the end at which point I did a double-turn edge on them and I thought it worked out great. No problem at all! I also opted to do the double-turn hem which, while making a nice neat edge, may have made the hem a little heavy for the dress.

OLYMPUS DIGITAL CAMERAI also didn’t read to the end of the pattern, which means I constructed the back pleat improperly 😦 Once I did read the end of the pattern, their way really seems like it would have been much easier.

All in all I’m really pleased with this dress and would definitely make another!!


Hand-Sewn Felt Embroidered Baby Onesies: Tutorial

Since all my friends simultaneously decided to hop on the baby train about a year ago, I’ve been making adorable (if I do say so myself!) hand-sewn onesies for the little booger machines. I’ve given a sneak peak before in my previous post showing what I made my nephew for Christmas and now it’s time for a tutorial!

This week I made a couple onesies for some cute little baby girls and took pictures along the way. Check out this cute skull with a bow onesie!

OLYMPUS DIGITAL CAMERAHere’s what you’ll need for this project;

SAMSUNG

Materials List:
– onesie
– felt
– embroidery floss
– scissors
– fabric glue

Seems like for a new born baby you’d buy the newborn size (0-3 mos.) onesie, right? Not always. Some of my friends have birthed behemoths….er….I mean, healthy-weight…..babies that actually never fit the 0-3 mos. clothing size. You might want to consider purchasing a 3-6 mos. onesie, the baby can always grow into it!

When getting started I take the time to first sketch my pattern out on a piece of paper. This gives the nice advantage of reproducibility if I save the paper template for future projects.

OLYMPUS DIGITAL CAMERAUse this template to trace out your pattern onto a square of felt and cut the pattern.

OLYMPUS DIGITAL CAMERAOLYMPUS DIGITAL CAMERAAlthough I reinforce the felt with embroidery, I always like to first adhere the felt to the onesie with fabric glue. This helps to hold the applique in place while I’m sewing and adds a little extra strength to the final product.

OLYMPUS DIGITAL CAMERAI use bottled glue instead of spray glue because I find that when working with small pieces of fabric like this, the spray glue can get a little messy. I try to keep the glue away from the edges where I’ll be sewing because putting the needle and thread through the glue repeatedly really gums it up and leads to tangling while trying to embroider.

Center your felt cutout on the onesie. I usually try to position it so that it will center on the child’s chest, but it can be pretty cute to sew something to the bum of the onesie.

OLYMPUS DIGITAL CAMERAFor both a decorative detail and additional strength, I embroider around the edge of the felt with a complimentary color of embroidery floss.

Standard embroidery floss is actually composed of 6 thin threads. I find it is too difficult to work with the floss at full thickness so I separate out 3 strands to embroider with. Just hold on to the 3 you want to use, gently pull on the 3 you’re setting aside and it should separate pretty easily (the longer your thread, the more likely it is to tangle).

OLYMPUS DIGITAL CAMERAOLYMPUS DIGITAL CAMERAI used blanket stitch to embroider around the edges of the felt applique. Blanket stitch is a really easy way to add a cute embellishment that I’ve shown before in my double-sided napkin post.

To do blanket stitch, first come up through the fabric from the bottom, then put the needle back down through the fabric about 1 cm over and 1 cm down (or whatever spacing you’d like), and pull the floss through. Leave a little slack in the floss, don’t pull it all the way through.

OLYMPUS DIGITAL CAMERAWhen bringing the needle back up, bring it up on the edge of the felt across from where you brought the needle down. Make sure to bring the needle up inside the loop of floss left on the top. Pull taught.

OLYMPUS DIGITAL CAMERA

OLYMPUS DIGITAL CAMERAHere’s a nice YouTube video describing the process if you found that a bit confusing.

Embroider around all edges of the felt to give it a cute hand-made look.

OLYMPUS DIGITAL CAMERA

OLYMPUS DIGITAL CAMERAI wanted to add just a touch more sweetness to this little skull so I also cut out a bow in pale pink felt. Just cut two pieces, one larger oval and one thin rectangle.

OLYMPUS DIGITAL CAMERATo form the bow, pinch the oval in half along the long edge, then fold the edges back onto themselves.

OLYMPUS DIGITAL CAMERA

OLYMPUS DIGITAL CAMERAI added a little stitch at this point to hold it together while I used the thin rectangle segment to wrap around the center of the bow and stitched it all together.

OLYMPUS DIGITAL CAMERAHand-stitch the bow to the skull and you’ve got one adorable onesie!!

OLYMPUS DIGITAL CAMERAI’ve probably made about 20 of these over the past year or so. Once you get the hang of it, it usually only takes about 1.5-2 hours to pull a onesie together!

Here are a few other ones that I’ve made over the past year…

SAMSUNG

SAMSUNG

SAMSUNG

SAMSUNG

SAMSUNG

SAMSUNGI’ve linked this onto parties over at Thirty Handmade Days, So You Think You’re Crafty and Nap Time Crafters. Head on over and see what other crafters have linked to the parties!


DIY Mixed Flower Bridal Bouquet: Tutorial

I got married last week in a small family-only civil ceremony on Jones Island in the San Juan Islands off the coast of Washington. It was perfect! It was really important to both of us to have the things we wanted without breaking the bank. For me, that meant a couple small DIY projects. One of these was the flowers.

Photo credit: Matthew Land http://matthewland.com/

Photo credit: Matthew Land
http://matthewland.com/

Getting married in such an isolated location puts some limitations on vendor availability. I really just had two florists in town to choose from and at a starting price of $125 for a bridal bouquet, I chose neither! Instead, I bought my wedding flowers from the grocery store!!

I popped into the grocer a couple days before the wedding to scout the flower situation and found out when their shipments of flowers come in so I could buy the freshest flowers with the largest selection. I chose three mixed flower bouquets in a purple and yellow color scheme for a total cost of $28 (that’s $97 savings!).

OLYMPUS DIGITAL CAMERAMaterials list:
2-3 bouquets of flowers
Green florist tape
Straight pins
Elastic bands
Shears/scissors
Ribbon/hankie

Step 1: Strip your flowers.
While all those leaves and filler bits look great in a bouquet in a vase, they get in the way when trying to construct a bridal bouquet. So before getting started with any arranging, you want to strip your flowers of ALL leaves and organize them by flower type.

OLYMPUS DIGITAL CAMERA

Step 2: Pick your “Show Off” flower.
Once you’ve got all your flowers laid out, you’ll want to choose one or two flowers that will be the center of your bouquet. This should be a larger flower and should be your favorite. I chose the Gerbera daisy as the focal point for my bouquet.

Next you want to select a few flowers to surround your center flower. When adding these it’s nice to work in odd numbers and to keep things even. I add three stalks of flowers around the daisy (pardon the blurry photo!).

OLYMPUS DIGITAL CAMERAStep 3: Florist tape.
Take the time to arrange these few center stalks. When you’re satisfied, use florist tape to hold them in place. Florist tape is a stretchy green tape that’s a bit tacky, so when you wrap it around itself it will self-adhere. It’s what boutonnieres are often wrapped in.

OLYMPUS DIGITAL CAMERA

Step 4: Add more flowers.
Next you’ll want to add a few more flowers, in the same even manner as above. If you’re going to add odd flowers, try to balance them with an odd flower on either side of the bouquet. Here, I’ve added clusters of purple flowers evenly spaced around the yellow. Secure the stems with more florist tape every four or five stalks.

OLYMPUS DIGITAL CAMERAIf you’re going to add flowers unevenly, try to balance them. For example, in my bouquet I added a yellow lily and orange carnation to one side, then some white daisies to the other (see finished pictures).

Step 5: Add your “filler” and greenery.
Once you’ve got your bouquet built up a little, but not quite finished, it’s time to add your filler and greenery. I added stalks that stood up straight to the back of the bouquet and added looser more droopy stalks to the front of the bouquet.

OLYMPUS DIGITAL CAMERA

As the bouquet gets larger it gets more difficult to secure the stems with florist tape alone. I wrapped the florist tape with an elastic band when I found it was getting a little unwieldy, just to make sure everything would stay nice and secure.

OLYMPUS DIGITAL CAMERA

Step 6: Add finishing flowers.
The final step is adding a few flowers to the outside to fill in the bouquet and to surround the filler and greenery. I just added flowers until I was happy with the size of the bouquet, making sure the central showcase Gerbera daisy was always visible.

For the final step to keep things nice and tight, I secured the florist tape with straight pins.

OLYMPUS DIGITAL CAMERA


Since the bottom of the bouquet would be visible, I also took the time to give the stems a nice even blunt cut at the bottom. I don’t have any pictures of it, but as a final step I wrapped the bottom of the bouquet in my granny’s handkerchief to cover the florist tape.

And voila! My finished bouquet! (I’m hoping there might be a better picture when we get our photos from the photographer. I’ll update the post if I find a better shot).
OLYMPUS DIGITAL CAMERA

bouquet in action

Re-Grow Your Green Onions

I live in an apartment with no outdoor space so it’s hard to grow my own vegetables. And, in fact, when I lived in an apartment that had outdoor space some unknown demon animal stole all the fruits of my gardening labor! Anyhoo, I thought I’d give regrowing veggies from scraps a go and started with green onions.

OLYMPUS DIGITAL CAMERAI put the whites of some chopped green onions (you can see where the original cut lines were) in a glass lined with paper towel and about a half inch of water. I stuck them in the window and change the water every couple days. They’ve grown about 8 inches in a week! I think I’ll plant them in a little potting soil now and see how they do!

OLYMPUS DIGITAL CAMERAIn other news….life is cray cray right now!!!! And is likely to continue that way with lots of travel and life changes in the coming month. I’ll post when I can, but sadly June and July might be light on the posts. I apologize in advance!


DIY: Plaid Elbow Patch Appliques

Pete has a sweater that goes everywhere with him. It’s been stuck overnight on the top of Mount Hood with him, it’s been to Yosemite, it’s been to the Alps, it’s been to sea, it’s been to Alaska. It’s been crammed into his backpack on virtually every trip he takes. It’s actually shocking that it’s taken this long to develop a hole!

On a trip to NYC Pete saw a dude wearing a sweater with plaid elbow patches and asked if I could do something similar for him. No problem!

The finished product!!

The finished product!!

With the knit sweater I was worried about two things if I simply sewed a patch on top; 1. that the hole would continue to grow under the patch, and 2. that the patch would be difficult to sew on stretchy knit fabric. So I decided to make my own iron-on applique elbow patches using an adhesive web called Pellon. Below are step-by-step directions to make your own applique patches.

Materials list;
– sturdy plaid fabric
– paperbacked adhesive web, such as Pellon
– scissors
– pins
– iron
– damp cloth
– sewing machine

OLYMPUS DIGITAL CAMERA

1. Cut out a rough shape in fabric, and the same shape, slightly smaller, from the paperbacked adhesive web. 

2. Lay the paperbacked adhesive web on the ironing board, bumpy-side-up, and lay the fabric over top, wrong-side-down. Iron on high for about 8 seconds. Now your fabric should adhered to the adhesive web. Be careful to not touch the bumpy (glue) side of the adhesive web to the iron or it might muck up your iron.

OLYMPUS DIGITAL CAMERA

3. Trim the fabric fused with the web to the desired size. I made a patch that was about 6″ x 4″ with rounded edges.

4. Peel the paper backing from the adhesive web. It can help to grab the edge of the fabric and make a little tear to get the backing off. Now you left with an iron-on fabric patch!

OLYMPUS DIGITAL CAMERA

5. Make someone model the sweater so you can position the patches properly on the elbows and pin them in place, web-side-down. I did this on the side with the hole, then removed the sweater and positioned the other patch by measuring, to make sure they’d be positioned symmetrically.

6. Lay the sweater with pinned-on patch on the ironing board, patch-side-up. Overlay with a slightly damp towel (needed to keep the fabric from burning while adhering the patch). Carefully remove the pins without changing the position of the patch, then iron for ~15 seconds with firm pressure. The Pellon instructions say to do this on the wool setting, but I was repairing an acrylic sweater so used the synthetic setting and found it still adhered well.

OLYMPUS DIGITAL CAMERA

7. I worried the edges of the patch might peel up or fray over time so I finished them with some decorative stitching around the edge on my sewing machine. I set my sewing machine to a zigzag stitch with 4.5 width setting and 0 length setting and carefully sewed around the edge of each patch.

OLYMPUS DIGITAL CAMERA

OLYMPUS DIGITAL CAMERA

I gotta hand it to Pete, the plaid patches were a great idea and the sweater looks pretty cute now! We had also debated leather/suede or corduroy patches, but I’m glad we went with the plaid.

Baby Name Art: Felt Embroidery DIY

A friend of mine just had a gorgeous baby girl: Stella Joy! My go-to baby gift is normally a set of felt applique onesies (tutorial, one day!), but I really dropped the ball with baby Stella and before I knew it….she was here!

I decided to branch out a bit and, inspired by some things I found on Pinterest here, here and here, I made Stella some baby name art. I’m so happy with how it turned out and I hope her parents love it too!

OLYMPUS DIGITAL CAMERAThis project wasn’t too difficult, but all the stitching around the name took a lot longer than I expected!

To make this, all you’ll need is;

– an embroidery hoop (mine was 16″)
– one sheet each of green, white, pink, and blue felt
– white and pink seed beads
– one skein each of white, black, blue and pink embroidery floss
– two skeins of green embroidery floss
– lightweight cotton/muslin (18-20″ square)

OLYMPUS DIGITAL CAMERAI first cut a large circle from the blue felt, about 1″ diameter smaller than the embroidery hoop and, with muslin secured in the hoop, sewed the blue felt to the white cotton backing using the blanket stitch with blue embroidery floss. I then sewed the green felt on just as I had the blue.

To make the name, I cut paper stencils and held them in place with straight pins while I gently traced around them with a felt pen. (I’m not sure why the color is off in these couple photos, the green is really more of a soft mint rather than the harsh lime it appears here).

OLYMPUS DIGITAL CAMERAOnce I had the name traced onto the fabric I sewed around it using a simple backstitch.

OLYMPUS DIGITAL CAMERAThe grassy embroidery effect around the name was created by sewing small straight stitches in a random pattern about a centimeter around each letter. I diluted the stitches toward the edge of the letters to try to give the impression of grass.

OLYMPUS DIGITAL CAMERAOLYMPUS DIGITAL CAMERAOLYMPUS DIGITAL CAMERAInspired by something I’d seen on Pinterest I used concentric circles cut out of felt to make some sheep and flowers, adding a seed bead to the center of each for a nice girly touch.

OLYMPUS DIGITAL CAMERAOLYMPUS DIGITAL CAMERA

OLYMPUS DIGITAL CAMERA

OLYMPUS DIGITAL CAMERAThe little sheep legs were made using backstitch and the heads were a simple satin stitch. The expanse of blue sky seemed a little vacant when I was done and I was worried clouds would compete with the sheep, so I added a little heart embroidered on using blanket stitch.

OLYMPUS DIGITAL CAMERAWith the front finished, I wanted to make sure the back looked just as polished, so I tried to finish it as nicely as I could (without wasting too much time on it). Unfortunately, I didn’t take pictures of the process because I was going to just link to another tutorial on a blog I frequent. When I went back to look at it though, I realized that I didn’t actually follow it at all and made up my own method instead after I’d already finished without taking any pictures….whoops!

OLYMPUS DIGITAL CAMERA

I cut the excess backing fabric away leaving about a 2″ border. The I ran my needle through it very loosely gathering it toward the center of the backing. I cut a circle from felt about and inch smaller in diameter than the embroidery hoop and attached it to the gathered backing using blanket stitch.OLYMPUS DIGITAL CAMERAAnd that’s about it! Hope Stella likes it! 🙂

OLYMPUS DIGITAL CAMERA


Tutorial: Simple Double-Sided Cloth Napkins

My mom’s kitchen is blue and white, so when I saw the Ravena fabric line by Dear Stella on Fabricworm I immediately thought of her. I decided to make her some simple double-sided cloth napkins for a birthday/Mother’s day gift and I’m pretty pleased with how they turned out.

OLYMPUS DIGITAL CAMERAI started with a half yard of each fabric (the smallest size I could order) and cut two 17″ squares of each using my rotary cutter.

OLYMPUS DIGITAL CAMERAReflecting on the New Year’s resolution I made this year to be more patient with sewing projects and take the time to use proper techniques, I did something that I’ve never done before…..I ironed my hems! I folded the fabric 1/2″ on all sides and ironed them flat to make them easier to pin and sew.

OLYMPUS DIGITAL CAMERAWhen I got to the corners, I tucked the fabric in to make much neater mitered corners.

OLYMPUS DIGITAL CAMERAOLYMPUS DIGITAL CAMERAI then pinned the fabrics with wrong-sides together in pairs of light and dark fabric, making sure that the folded edges stayed tucked inside and taking special care to make sure the corners stayed neat. (Note: when buying fabrics online, if you purchase fabrics from the same line/designer you can be assured the colors will match).

OLYMPUS DIGITAL CAMERAOLYMPUS DIGITAL CAMERAIt was only after I top-stitched around the edge of each napkin, with about 1/4″ seam allowance, that I realized making the napkins with one dark side and one light side might not have been the best idea – if the light side gets stained, the dark side makes it so it can’t be bleached! Ooops!

OLYMPUS DIGITAL CAMERAThe napkins were probably good as-is at this point, but since they were for a gift I wanted to add a little extra handmade touch and decided to embroider a decorative border around the edges using navy embroidery floss.

I used three different very simple stitches. The small ‘x’ pattern was made by sewing the first lines of all the ‘x’s all the way around the napkin, then going back and crossing over with the line in the other direction to complete the ‘x’ (like cross-stitching).

OLYMPUS DIGITAL CAMERAThe larger ‘x’ pattern was made in the same way except the embroidery floss was brought up and over the edge of the fabric so that the ‘x’ pattern actually wrapped the edge of the napkins.

OLYMPUS DIGITAL CAMERAI also made a couple napkins using a basic blanket-stitch (I was actually a little disappointed with how these ones turned out, I was hoping the edging would be more visible).

OLYMPUS DIGITAL CAMERAI gave them all a final iron before folding them neatly and wrapping them up with a bow for the gift!

OLYMPUS DIGITAL CAMERAOLYMPUS DIGITAL CAMERAI think my mom really appreciated the gift, especially since it turns out her old navy napkins had been getting faded and she’d been searching for some new ones to replace them!


So Much Fabric, So Little Time….

First off, apologies to anyone who has noticed that I haven’t posted in a couple weeks. I’ve been working on projects that are gifts (tutorials soon, I promise) and didn’t want to post them and spoil the surprise for the recipients! Also, my old laptop is in the process of dying a long, slow, painful death. After more than about 10 minutes awake the poor thing just seizes up on the desk in a fit of fearful dementia until I put it to sleep again, wondering if it will wake up next time….

……which is why it’s my old laptop and I now have a new laptop (Windows 8 is a trip, eh?).

Anyhoo, a couple weeks ago I was forced, practically against my will, to stop in to Britex to pick up some supplies for the aforementioned gifts, and Lord knows I can’t control myself in there! Somehow I always emerge back onto the street stunned, confused and blinking into the light after losing 3 hours of my life and a hefty chunk of my spending money.

But it makes me so happy!!! So who cares, right?!?!?!

I thought I’d share my purchases and what I’m thinking so far…..

1. Teal knit jersey – 3 yards.

OLYMPUS DIGITAL CAMERA

I  bought this with a t-shirt dress in mind. It’s a little on the heavy side,  which was intentional since I didn’t want the dress to end up too clingy. I’ve been thinking that Vogue (easy) pattern V8685 might work nicely, adding a bit of tailoring detail to keep it from being too boring.

2. Brown, teal and orange polyester shiny and soft floral – 1.5 yards.

OLYMPUS DIGITAL CAMERA

This fabric is the only fabric I actually intended to buy when I walked into the store (tee hee) and had an actual pattern in mind before purchasing the fabric as well. I think it will work really well for this simple Spring Blouse pattern from Craft Habit.

3. Super bright total impulse buy floral – 1.5 yards.

OLYMPUS DIGITAL CAMERA

I bought this beautiful bright floral print fabric as a total impulse buy. One of the women who works at the store was cutting some for another customer and I simply had to have it! Originally I had been thinking about using it for a maxi skirt to wear with a white tank top, but once I unfurled it at home I realized it was probably a bit too busy for such a large garment. I’m still a little undecided on this one but I like the idea of a button-up blouse with nice feminine sleeves. I’ve been thinking that the Vogue pattern V1152 would shorten into a blouse nicely.